Pattern Description:
The Adams is one of the most popular dry flies in the country. Originated by Len Halliday in Michigan, it was first conceived as an adult caddis imitation. Through the years the pattern became bastardized into what is now the commonly accepted mayfly profile. I tend to use the Adams as an attractor/searching pattern more than a specific hatch matcher. The addition of a more durable hair tail, more robust body taper and heavy hackle makes this fly more useful on brawling western waters. The common version is much like my own, but far more lightly dressed. The methods and techniques used to tie the Adams can also be used to tie a variety of other patterns. Feel free to change the components. Some common variations include different colors of dubbing for the body, hackle fibers tails and varying the color of the hackle tips for the wings. White hackle tip wings make the fly much more visible on the water.
Make a few changes to your patterns and see what you can come up with. It never hurts to show the fish something a little different.
Materials Needed:
Hook: TMC 100 #10-20
Thread: 70-denier black
Tail: Moose Hock
Wings: Grizzly Hen Hackle Tips
Body: Gray Beaver Dubbing
Hackle: Brown and Grizzly Rooster Hackle
Step 1
Attach the thread and wrap a base to the bend.
Step 2
Cut, clean and stack a clump of moose hock. Measure the hock against the hook so it is a shank length long.
Step 3
Transfer the hock to the material hand with the tips in your fingertips. Place the hair against the near side of the hook with the pre-measured butt end (of the tail length) at the bend. Wrap over the hair with a couple semi-tight turns. Allow the thread to torque the clump into position on top of the shank.
Step 4
Continue wrapping forward over the butt ends to the sixty percent point on the shank. Take care to keep the hair on top of the shank as you wrap over it.
Step 5
Cut the butt ends of the moose hock off at the sixty percent point. Wrap a thread base on the front end of the hook from the sixty percent point to the back edge of the index point, and back again to the 75-80 percent point in preparation for the wings.
Step 6
Select two nicely matched hen hackle feathers that have tips about the same width as the gap of the hook. A little more or less is okay; the gap measurement is just a rule of thumb.
Step 7
Oppose the curves of the two hen neck feathers by placing them outside to outside. That is, with the outside of the feathers facing each other. The outside of the feather is the side that faces out from the bird, the inside faces toward the birds skin. Even the tips by sliding the bases back and forth in your fingertips.
Step 8
Once the tips are even, measure them against the shank so they are equal to a HOOK length. A hook length is from the eye to the back of the hook bend, thereby being slightly longer than a shank length (eye to bend/base of tail). I stroke the fibers back at an estimated point on the feathers to get a rough estimate. Stroke more or less fibers back to reach the proper length.
Step 9
Transfer the feather tips to the thread hand with your fingertips at the point at which they are equal to the hook length. That is, the portion of the feather tips inside your fingers should be one hook length long. Cut the butt ends from the feathers at this point.
Step 10
Place the butt ends of the tips on top of the shank with the thread hanging directly below the tie in point. We have purposely cut the wings slightly longer than their ultimate length to allow for enough extra to tie the feathers in. The finished wings should be one shank length long, and the extra length will be used to attach the butt ends to the hook.
Step 11
Hold the feather tips in place on top of the hook with the thread hand and execute a couple of pinch wraps over the bases to attach the feathers to the hook.
Step 12
The wings should now be attached to the hook with one shank length worth of tips pointing out over the hook eye. Use an identical hook to measure the wings. Make sure they are one shank length long before proceeding.
Step 13
Pull both wings up and back along the hook shank. Bring the thread to the front of the wings and build a small thread dam against their bases to prop them upright.
Step 14
The completed wings should stand up at a near ninety-degree angle to the hook, as shown. The wings can be separated with your fingertips so they form an approximate thirty-degree angle between them. The natural curve of the feathers, as well as the opposed configuration, will hold the feathers at this angle. There is no need for figure eight or X-wraps between the wings.
Step 15
Bring the thread back to the mid-point on the shank. Dub the thread with a thin, level strand of dubbing. Use the bare thread between the end of the dubbing and the hook shank to work back to the base of the tail. Make the first wrap of dubbing at the base of the tail and work forward forming a single, level layer to the sixty-percent point on the shank.
Step 16
Wrap back over the first layer of dubbing to its mid-point and then back forward to the sixty-percent point again. Layer the dubbing back and forth over the front third of the body to create a robust taper. The whole body should take up sixty-percent of the shank length. The distance from the front edge of the body to the wings and the front edge of the wings to the index point should be equal. Keep the thread at the immediate front edge of the dubbed body.
Step 17
Select and prepare two or three hackle feathers, depending on the size of the fly. I am tying a size twelve here, so I have elected to use three feathers to create a bit more buoyancy and wider footprint on the water. Make sure all the feathers have equal length fibers, about a gap and a half long.
Step 18
Strip the butt ends of all three feathers exposing the quill for a length of about three eye lengths. Stack the feathers on top of each other with the insides all facing down. Tie the feathers in by their butt ends at the front edge of the body. I like to leave about a half turn of bare quill exposed behind the initial thread wraps. This bare quill will prevent the first wrap of hackle from leaning back along the shank.
Step 19
Wrap forward over the quills to the rear edge of the index point. Start at the front of the body and bind down the butts of the feathers up to the wings with a smooth, even layer of thread. Cross the thread under the wings and continue wrapping over the quills up to the rear edge of the index point.
Step 20
Begin wrapping the feathers in tight concentric turns up to the back edge of the wings. I like to wrap all three feathers at the same time with my fingers, as opposed to using hackle pliers, because it allows me to keep the feathers closer together as I wrap. An alternative would be to wrap both brown feathers together first, with a slight amount of space between the turns. Then come back and wrap the grizzly feather forward through the spaces.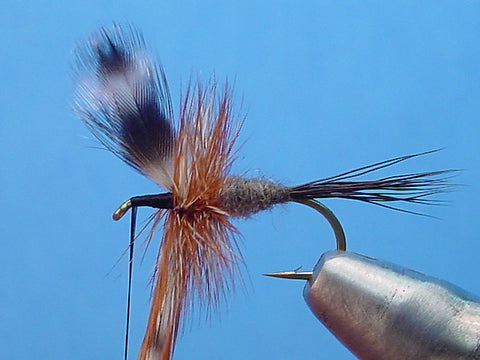
Step 21
Grasp the wings and wrapped portion of the hackle and hold it back and out of the way as you cross the hackle feathers under the hook to the front of the wings.
Step 22
Make the next wrap of hackle at the immediate front edge of the wings, and then continue wrapping the hackle forward to the index point. On this fly, I made five turns behind the wings and four in front for a grand total of 27 individual wraps of hackle (3 feathers X 9 turns = 27). This could be considered overkill, but as I said, I use the Adams as an attractor/searching pattern more than a hatch matcher. This wide hackle footprint makes the fly show up better on the surface of heavy water.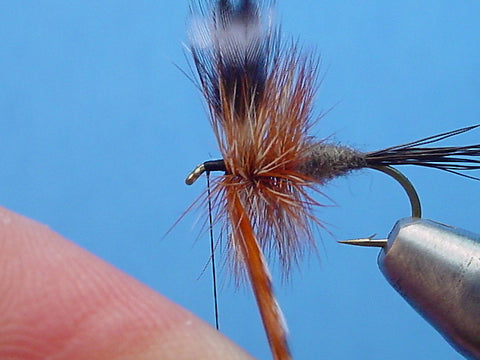
Step 23
Once at the index point with the feathers, pull the hackle straight up from the hook and make a turn of thread over them. Do not pull the feathers out away from the hook eye as you tie them off. This will result in trapped fibers that will protrude out over the hook eye and become nearly impossible to trim off cleanly. Make a couple more turns of thread over the hackles to secure them and clip the tips off flush against the shank.
Step 24
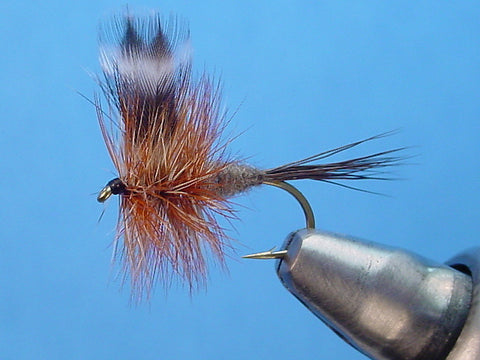
Build a small but smooth thread head and whip finish behind the hook eye. Clip the thread.
Step 25
Finished fly, side view. Notice the length of the tails and wings, the taper of the body, and the proportions of body to hackle