Tim Heng has been a fixture in Colorado’s Roaring Fork Valley for nearly a hundred years now. As the Manager of Taylor Creek Fly Shop, and years of guiding, Tim has built an unparalleled reputation as a boat-rowing, fish-catching machine. It doesn’t hurt that Tim is also one of the most genuinely nice people in the world. I remember wandering into Roaring Fork Anglers (Tim managed RFA before moving up valley to Taylor Creek) way back in the day, when I was a kid, trying to talk someone into giving me an order of flies to tie. I met Tim, and he not only took the time to talk with me, he ordered a bundle of flies and helped me out quite a bit on where to fish. Since then, I have followed Tim up through the industry, and ended up taking his advice on many things over that time. He truly is one of the nicest people I’ve ever met with a real passion for the sport and the people. And now, for his fly! The Autumn Splendor was born nearly twenty years ago when one of Tim’s clients fished a big, doll-eyed bass fly in the same colors and moved a bunch of fish. Tim says, “It MOVED a bunch of fish, but no of them ate it!” So Tim got on the vise and created the fly we all now know and love. I tell ya, this guy is always looking out for the rest of us! At any rate, the Autumn Splendor has since become of the most popular streamer patterns in the country, and here is my version of it. I should note that Tim ties the original with both a copper colored cone and three single strands of rubber for the legs. Frankly, I tie them that way too, but for some reason I thought I’d show the fly with a double set as listed here. The Splendor is a great pattern to throw at the banks from a drifting boat, preferably with Tim on the oars. Strip it fast or just pump it with the rod tip. The warm colors and vibrating legs really pull fish in and it has accounted for some of the nicest fish I’ve seen come out of the Fork and Colorado. Make sure you have a few in your box for this spring and fall.
Materials Needed:
Hook: Tiemco 5263 or Daiichi 2220, #2-10
Cone: Brass or Tungsten, gold or copper colored
Weight: Lead wire
Thread: 3/0 Brown Monocord
Tail: Brown Marabou
Flash: Copper Krystal Flash
Rib: Small or Brassie sized Copper Wire
Body: Medium Brown Chenille
Legs: Medium Round Rubber Legs, Yellow
Hackle: One Grizzly dyed Orange and one Grizzly dyed Yellow Saddle hackle
Step 1
Place the cone over the hook point and slide it up to the eye. Wrap about fifteen turns of lead wire around the shank and break off the ends. Shove the lead wraps up into the cone to center it on the hook. Start the tying thread at the rear of the lead wraps and build a thread base over the lead and back to the bend of the hook. You may want to go back and forth a couple times with the thread to lay a nice, solid base down.

Step 2
Select and match two brown marabou feathers for length and measure them against the shank so they are as long as the hook from the eye to the bend.

Step 3
Tie in the marabou at the bend of the hook with several tight turns of thread. Wrap forward over the butt ends of the marabou feathers to the back of the lead wraps. Go back and forth over the marabou butts with the thread to securely anchor the tail.

Step 4
Clip the butt ends of the marabou at the rear edge of the lead wraps and make a few turns of thread to smooth out the stubs.

Step 5
Tie in three strands of Krystal Flash at the midpoint of the hook. Attach the Krystal Flash at the center of its length as shown.

Step 6
Pull the three strands back along the far side of the hook and bind them in place on the side of the tail.

Step 7
Pull the other half of the Krystal Flash back along the near side and bind it down to the base of the tail as well. The flash should now be running down either side of the tail.

Step 8
Clip the flash so it is just a bit longer than the marabou in the tail.

Step 9
Cut a six-inch length of brown chenille from the card and pull a few fibers from the end, exposing the cotton core.

Step 10
Tie the chenille in by the core at the base of the tail and secure it in place with several tight thread turns.

Step 11
Tie in an eight-inch length of copper wire just behind the cone and wrap back over it to the bend of the hook. Wrap back and forth over the wire to secure it tightly.

Step 12
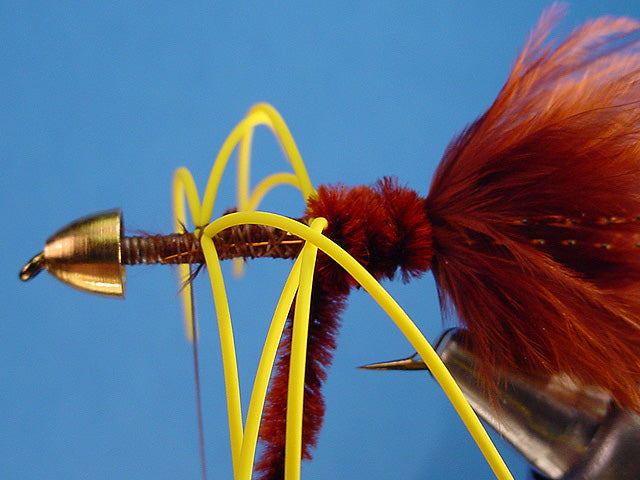
Tie in two strands of round rubber about a third of the way forward from the tail with a couple of X-wraps. Make sure the wraps are tight, but don’t sweat it too much if the legs go a little crazy.

Step 13
Move the thread forward another third of the shank and tie in another pair of rubber legs as you did above.
Step 14
Begin wrapping the chenille forward to the first set of legs. Butt the last turn of chenille right up against the back edge of the legs.

Step 15
Continue wrapping the chenille forward through the legs. The chenille should not split the leg pairs, just butt up against the front and back edges of them. Tie the chenille off at the back edge of the cone. I always make an extra turn of chenille behind the cone to fill the void in the concave side of the cone.

Step 16
Select one grizzly dyed orange and one grizzly dyed yellow saddle hackles. You want nice, wide, webby feathers for this fly. The hackle length is open to interpretation, and I like a feather with a bit of taper to it so the hackle will be linger at the front then it is at the back. Stack the two feathers inside to outside and prepare the butts by stripping the fluff and exposing the bare quill for a length of about a quarter inch.

Step 17
Tie the two feathers in at the front edge of the chenille body with the insides of the feathers toward the hook shank. Make several tight wraps over the butt ends to really secure the feathers here.

Step 18
Grab the tips of both feathers (either with your fingers, or in a pair of hackle pliers) and evenly palmer wrap the feathers back to the bend at the same time. Try to keep the wraps a bit closer together at the head end and spaced a bit further apart at the bend.

Step 19
Catch the tips of the hackle feathers at the bend with the wire ribbing you tied in earlier and then spiral wrap the wire forward through the hackle. Be careful not to bind down too many hackle fibers as you go. It may help to zigzag (wiggle back and forth) the wire as you wrap.

Step 20
Tie the wire off at the back edge of the cone with several tight turns of thread. Helicopter the end of the wire to break it off.

Step 21
Sweep the hackle fibers back from the cone while you build a smooth thread neck behind the cone. You can even wrap slightly back over the front edge of the hackle to sweep it back a bit. Whip finish the thread behind the cone and clip it.

Step 22
Pull all four rubber legs up above the fly and trim them so they are about a shank length long.

Step 23
That’s it!

Step 24
Finished fly, front view.
