The Bead Head Pheasant Tail is yet another variation on the ubiquitous P.T. There are a few minor changes in the tying sequence when using the bead as well as adding the flash wingcase. Follow through this pattern for tips on tying it with or without the bead or the flashback.
I like to use the bead head version as a dropper under a dry or in a combo with an unweighted nymph. The addition of the flashback makes this fly show up well off-color water as well. There are a bunch of different variations possible, and they all work. It’s up to you to find out which ones you like best!
Materials Needed:
Hook: TMC 5262 #12-18
Thread: 8/0 UNI Rusty Brown
Bead: Brass, Copper or Tungsten, sized to hook
Weight: Lead wire, sized to hook
Tail: Ringneck Pheasant Tail Fibers
Rib: Fine Copper Wire
Abdomen: Ringneck Pheasant Tail Fibers
Wingcase: Ringneck Pheasant Tail Fibers topped with Firefly Flash
Thorax: Peacock herl
Legs: Leftover butts of Pheasant tail from wingcase
Step 1
Place the bead on the hook (with the small hole toward the hook point) and slide it up to the eye of the hook. Wrap 6-8 turns of lead wire around the shank behind the bead. Break off the ends and shove the lead into the back of the bead to center it and hold it in place.

Step 2
Start the thread behind the lead wraps and form a thread base tapering up onto the lead. Wrap the base back to the bend of the hook.

Step 3
Select 6-8 pheasant tail fibers and strip them from the quill. Measure the P.T. fibers against the shank so they are equal to one half of a shank length and tie them in at the bend. Wrap forward over the butt ends to the sixty percent point on the shank and clip the remainder.

Step 4
Tie in a piece of copper wire along the near side of the shank and wrap back over it to the bend of the hook.

Step 5
Select another bunch of P.T. fibers, about six or eight, and clip the tip ends square. Tie the pheasant tail fibers in at the bend of the hook with the tips extending to the sixty percent point. The tips will help to form the underbody and tying them in this way will eliminate any bump at the bend of the hook.

Step 6
Wrap forward over the butt ends to the sixty percent point, taking care to keep the underbody smooth and lump-free.

Step 7
Wrap the pheasant tail fibers forward to just behind the bead, about an eye length or so back. Try to keep the fibers side by side as you wrap without overlapping them too much. Tie the pheasant fibers off on the UNDERSIDE of the shank by holding them below the hook as you make a couple wraps of thread over them.

Step 8
Spiral wrap the rib forward over the abdomen with eight or nine evenly spaced turns. Feel free to counter-wrap the wire if you like, it really makes no difference. Tie the wire off at the front of the abdomen and break off the excess.

Step 9
Tie in two or three strands of Fire Fly flash at the center of their length on top of the hook at the front edge of the abdomen. I prefer the Fire Fly flash over standard Krystal Flash or Flashabou because its kinked surface adheres and shapes better over the wingcase. Krystal Flash and Flashabou are both much stiffer than the Fire Fly and thus make a flat looking wingcase.

Step 10
Double the front ends of the flash back over the abdomen and bind them down to the sixty percent point on the shank.

Step 11
Pull the pheasant tail fibers up above the hook and bind them down across the top of the shank back to the base of the flash/end of the abdomen/sixty percent point.

Step 12
Select half a dozen or so peacock herls from the eye of the quill and tie them in by their tips. It helps to cut the tips square first to give yourself an even bunch to tie in. Wrap back over the peacock herl to the base of the wingcase and return the thread to the back of the bead.

Step 13
Wrap the peacock forward forming a bushy thorax. Tie the peacock off and clip the excess.

Step 14
Pull the pheasant tail fibers forward over the top of the peacock herl thorax and tie them down at the back of the bead. Keep the wraps to a minimum to keep the bulk down.

Step 15
Pull the flash over the top of the pheasant tail fiber wingcase and tie them down at the back of the bead as well.

Step 16
Make sure the flash forms a smooth, even layer over the top of the wingcase, with no twisting or spreading.

Step 17
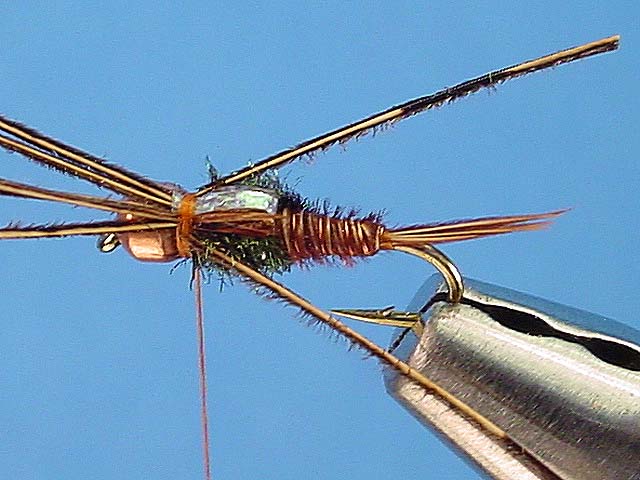
Clip the excess flash at the back of the bead. Pull one of the pheasant tail fibers that were left over from the wingcase back along the far side of the fly and bind it in place with a turn or two of thread.

Step 18
Pull another single pheasant fiber back along the near side of the hook and bind it in place also. Grab the remaining tips in your fingers, and while pulling down on the thread, snap them off.
Step 19
Build a smooth thread “neck” behind the bead to cover the tie down area.

Step 20
Whip finish the thread at the back of the bead in the neck area and clip the thread.

Step 21
Clip the legs so they are even with the back edge of the wingcase. Add a drop of head cement to the thread head and you’re done!
