The Birds Nest comes from California originally but has been adapted in size to accommodate many Colorado insect hatches. I first fished the Birds Nest in Cheesman Canyon years ago…tied down to a size twenty or so and the pattern was a killer. Since then, I have used this simple fly to match insects ranging from Green Drakes all the way to Callibaetis. This is, like so many others, a pretty simple little fly with a couple little tricks to make the tying go smoother. Read on, tie some up and try to keep the Birds Nests on the FAR end of your line.
Materials Needed:
Hook: TMC 3761 #10-20
Thread: Tan 8/0
Tail: Mallard Flank Dyed Wood Duck Gold
Rib: Fine Copper Wire
Abdomen: Superfine Dubbing, Callibaetis color in this case, but match the dubbing to whatever insect you wish…for that matter, you could use nearly any type of dubbing you like as well
Wing/Collar: Mallard flank Dyed Wood Duck Gold
Thorax: Dubbing to match abdomen
Step 1
Start the thread at the seventy five percent point and wrap a thread base back to the bend of the hook. Peel a clump of mallard flank fibers from the stem after first pulling them out at a right angle to the stem to even their tips, and measure this clump against the hook so it is about one shank length long.

Step 2
Wrap forward over the butt ends of the mallard up to the 75% point and clip the excess fibers flush.

Step 3
Tie in a six inch length of fine copper wire at the seventy-five percent point and wrap back over it to the base of the tail.

Step 4
Dub a tapered abdomen from the bend up to the 75% point.

Step 5
Spiral wrap the wire forward over the abdomen and tie it off at the front. Clip the excess wire. Make a thread base from the front edge of the abdomen up to the hook eye and back again.

Step 6
Even the tips and peel another, much larger clump of mallard flank fibers from the stem. I like to use the bigger, more webby feathers for the wing/collar on this fly, especially in larger sizes. Try to keep this bunch of fibers laying flat like a sheet for the time being.

Step 7
Lay the sheet of mallard fibers over the top of the fly with the tips extending back to about the hook point.

Step 8
Reach in with your material hand and fold the clump around the hook by pinching the clump.

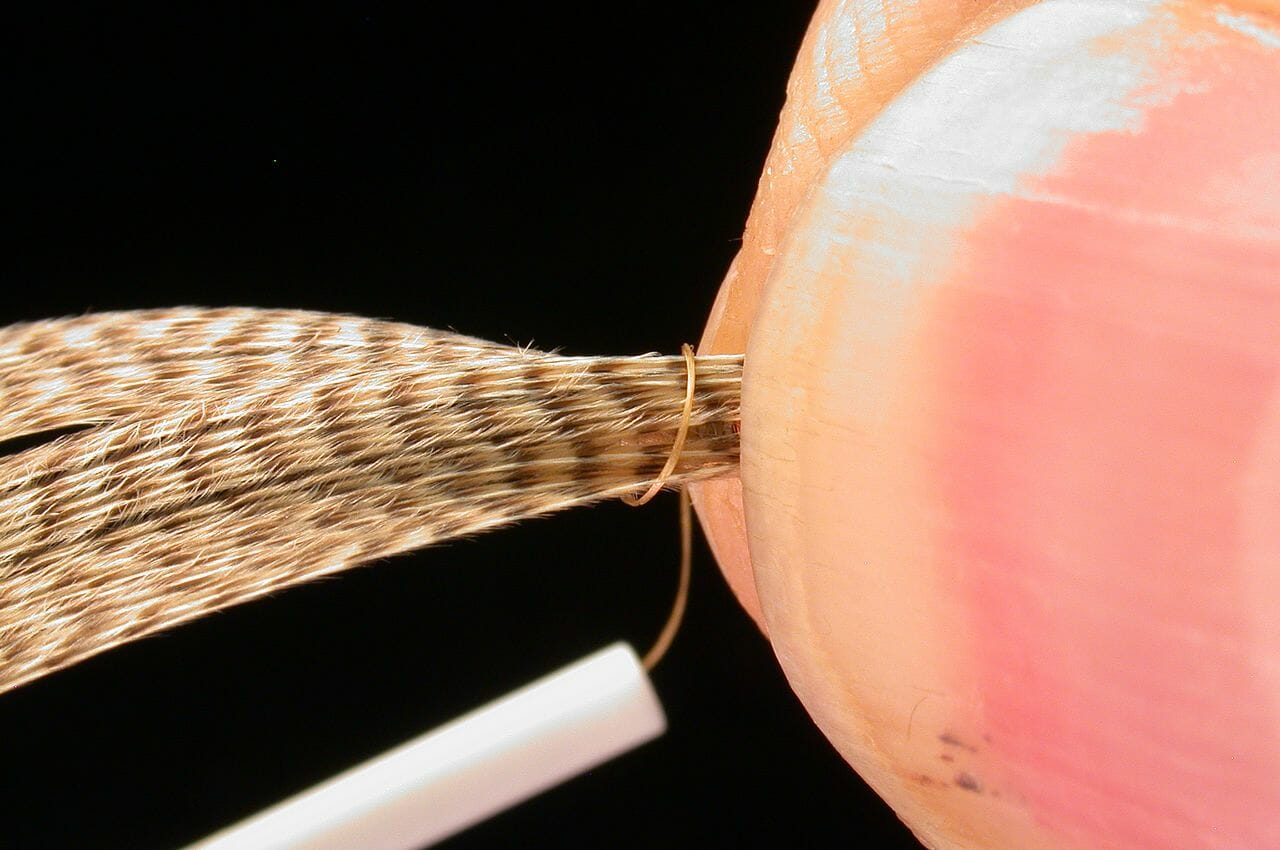
Step 9
Hold the fibers folded around the hook and take a loose wrap of thread (as shown here) around the base of the fibers at the front edge of the abdomen. Do not draw this wrap tight until it has come all the way around the hook two times, then tighten the thread wrap toward you to allow the fibers to splay around the shank.
Step 10
You may need to manipulate the fibers a bit to get an even distribution all the way around the shank. I try to get them spread evenly across at least the top and sides of the fly, if there is a bit of a gap on the bottom…no big deal.

Step 11
Clip the butt ends of the mallard flank fibers as close to the hook as you can.

Step 12
Begin dubbing the thorax by wrapping the dubbing from the back of the index point (one eye length back from the hook eye) up to the base of the wing.

Step 13
Return the dubbing to the back of the index point forming a smoothly tapered thorax. Whip finish and clip the thread.

Step 14
Top View
