The Black Nosed Dace is a traditional bucktail streamer pattern. After a long absence from western fishing, it has made a recent comeback with the rising popularity of these classic streamers. Bucktails are really very simple to tie, and the techniques used here are transferable to many other bucktail patterns. The Mickey Finn and Little Rainbow Trout are other bucktails tied with many of the same techniques.
Like the Black Ghost pattern listed here on the site, I have used the Tiemco 765TC hook here, as, again, the loop eye return wire makes a nice wide foundation for the wing and the ultra-sharp point is wickedly sticky. I have to admit, I haven’t fished a bucktail pattern in years, but after tying a few in preparation for this tutorial, I am looking forward to hanging one off the back of one of Dennis’ big, heavy Vanilla Ices or even a standard bugger. I think a slim profile fly like this would be a great trailer fly…not too imposing or heavy, subtle yet deadly. I have to go tie a few more.
Materials Needed:
Hook: TMC 765 TC, #2-10
Thread: 70 Denier, Black
Tail: Red Darlon
Body: Flat Silver Mylar Tinsel
Wing: Brown over Black over White Bucktail
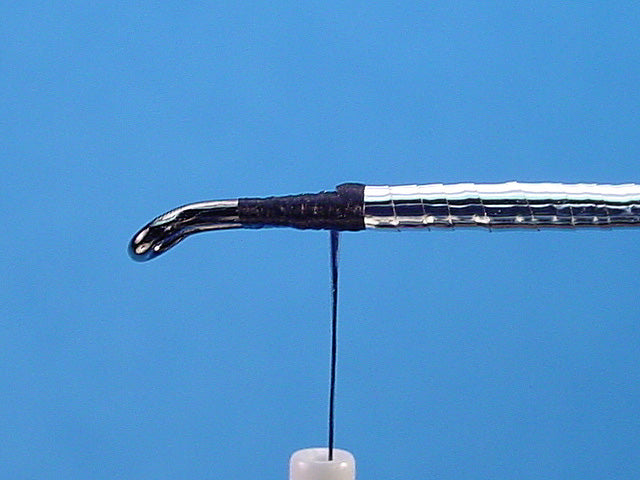
Step 1
Attach the thread behind the return wire and wrap a thread base back to the bend. Return the thread to the starting point.

Step 2
Tie in a whole strand of red Darlon at the back of the return wire. Wrap back over the Darlon to the bend of the hook, taking care to keep the Darlon on the top of the shank as you wrap over it. Don’t worry about the length of the tail at this point; we will trim it later, although the piece hanging off the back should be at least a half a shank length long. Yes, I know the original pattern has a fat, red wool yarn tail, but the Darlon just looks better to me. The wool has always appeared too fat to me, and I think the Darlon tail here fits in better with the slim profile we are going for. So there.

Step 3
Tie in a six- to eight-inch length of flat mylar tinsel with the gold side up/facing out. Wrap back over the tinsel to the base of the tail. Return the thread to the starting point.

Step 4
Wrap the tinsel forward by folding it at the rear of the hook so the silver side is up. Wrap the tinsel forward in slightly overlapping turns up to the starting point. Make these wraps as tight as possible. The shank should flex as you wrap the tinsel. Tie the tinsel off with a couple turns of thread at the starting point.

Step 5
Clip the stub end of the tinsel and the tail. The tail should be about equal to a gap width.

Step 6
Secure the stub end of the tinsel with several more tight turns of thread and then build a smooth thread base from the front edge of the body to the hook eye and back again. Notice that I leave a very slight space between the actual eye of the hook and the end of the thread base. This space assures a clean, smooth head can be built later.
Step 7
Cut a sparse clump of white bucktail and pull out all the short fibers. You really don’t want to stack the hair, although you can stack it to get it even then rearrange the hairs slightly to leave the tips a little jagged. We are looking for controlled chaos here, not barbered tips.

Step 8
Measure the white bucktail against the hook so the tips extend past the tail about half a hook gap width.

Step 9
Tie the bucktail in at the starting point with a narrow band of thread. Use a pinch wrap to secure the hair to the top of the hook. The return wire from the loop eye will help keep the hair from wanting to spin.

Step 10
Detail of the wing tie in. Notice the narrow BAND of thread and it’s placement (at the front of the body). Also, notice the amount of space between the front of the thread band and the hook eye. This space is key in forming the clean head we are trying to end up with.

Step 11
Cut the butt ends at an angle as shown. I tie left handed and so, I actually would make this cut from back to front, with the scissors in my right hand, but because of the 100-watt halogen lamp at the rear of the fly for photo purposes, I faked this one with my left. You got me.

Step 12
Detail of the wing butts after being cut at an angle. The butts should form a tapered ramp from front to back as shown. Do NOT cut the butt ends straight across or you’ll end up with a big sloppy head later.

Step 13
Wrap a smooth thread base over the butt ends of the white bucktail. Be sure to leave that space between the eye and the end of the thread base. Return the thread to the back of the head area.

Step 14
Cut and arrange a sparse clump of black bucktail as you did with the white. Both the white and black clumps should be about equal in size. Measure the black hair against the white so they are equal in length.

Step 15
Tie the black hair in on top of the white in the same manner as before.

Step 16
Trim the butt ends of the black hair the same way you trimmed the white; at an angle, remember?

Step 17
Repeat the above process again with a like-sized clump of brown bucktail. I use the brown hair from the front of the same natural white bucktail we used for the first clump. Measure this brown clump against the first two so they are all equal in length.

Step 18
Tie the brown bucktail in the same way as you did with the other two clumps. Keep the binding wraps toward the rear of the head here so as not to creep forward and ruin the taper we are working toward.

Step 19
Cut the butt ends of the brown bucktail at a slightly steeper angle than before. This cut will form the overall shape of the head so try to mirror the angle shown here as closely as possible. The angle of these cuts form the shape of the head, which should start to become clearer to you as you progress.

Step 20
Build a smooth, slightly tapered thread head to cover the butt ends. Make these wraps as tight as possible to keep them from sliding down the tapered front edge. Complete the head shape as shown and whip finish the thread. Clip it.

Step 21
Apply a coat of Sally Hansen’s Hard As Nails to the head. Let the first coat dry and then apply another coat. Be sure to get both coats all the way around the thread head and evenly cover it from front to back. Notice the eye length or so worth of bare space between the hook eye and the front of the thread head. Clean.

Step 22
Finished fly, side view. Note the length of the wing and the tail.

Step 23
Top view.

Step 24
Bottom view.
