The CDC Comparadun pattern has been one of my go-to patterns for a long time. This fly is the ultimate in simplicity and lends itself well to a variety of mayfly species. You can simply change the colors of the materials to match everything from Pale Morning Duns to Baetis to Green Drakes, while still using the same overall pattern. I especially like this fly for small flies, like autumn Baetis and the like. The CDC wing gives the pattern good floatation and visibility but doesn’t add so much bulk that it makes the fly look too big to the fish. One thing to keep in mind when fishing this, or any other CDC pattern, is to use Frog’s Fanny desiccant to treat the pattern both before and during fishing. Once you’ve caught a fish, be sure to RINSE THE FLY OFF IN THE WATER to eliminate the fish slime, dab it dry on your shirtsleeve and dust with Frog’s Fanny. This has been the best process I’ve found for keeping the CDC wing in good shape and floating high. I know this pattern looks simple, and it really is, but don’t let that look dissuade you from tying and fishing them. This really is a great pattern and is something I don’t leave home without.
Materials Needed:
Hook: TMC 101 #16-26
Thread: UNI 8/0 or 10/0 Gray
Tails: Synthetic Tailing Fibers, Color to match Natural
Abdomen: Tying Thread
Wing: Two CDC Feathers, color to match natural
Thorax: Beaver Dubbing, color to match natural
Step 1
Attach the thread at the seventy-percent point and leave a long tag end. Wrap back over the tag end to the bend of the hook, taking care to keep the tag centered on the top of the hook.

Step 2
Measure four (for #16) or two (for #18 and smaller) tailing fibers against the hook so they are equal to one shank length.

Step 3
Tie the tailing fibers in on top of the bend of the hook. Wrap forward over the butt ends to just past the point on the hook as shown. Press your thumbnail against the base of the tails to flare them upward. This will help in the separation process that follows.
Step 4
Pull the tag end up between the tails, one or two per side depending on fly size, and secure it down tightly to the shank with the tying thread. Clip the butt ends of the tails and the tag end of the thread at the seventy-percent point on the hook.

Step 5
Build a very thin, very slightly tapered thread abdomen over the butt ends of the tails. The abdomen should extend from the base of the tails to the seventy-percent point on the hook.

Step 6
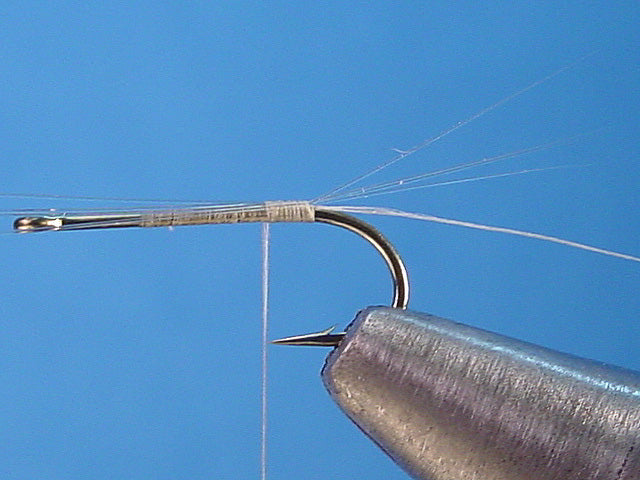
Wrap a single layer thread base from the font edge of the abdomen to the hook eye. Return the thread to the halfway point (87 and a half percent point, if you must know) between the eye and the front edge of the abdomen. This base will help to secure the wing to the hook.

Step 7
Select two CDC feathers and lay them inside to outside. Even the tips of the feathers so they are square as shown. On a small fly (#20 and smaller), you only need one feather.

Step 8
Tie the two feathers in with a couple of loose wraps of thread at the 87 1/2 percent point…that sounds goofy now, doesn’t it? I like to tie the feather tips in long and then pull them down to length. The tips should now be extending out over the hook eye one-shank length.

Step 9
Clip the butt ends of the feathers of as close to the shank as you can get.

Step 10
Cover the stub ends of the wing with the tying thread. Try not to build a large bump, only enough wraps to smooth and cover the butts.

Step 11
Grasp the wing in your fingertips and sweep it back along the abdomen while you build a small thread dam against the front edge of the wing to prop it up.

Step 12
The wing should look like this once it is properly propped up. Note that there are no posting wraps, only the thread dam against the front edge of the wing.

Step 13
Apply a very thin layer of dubbing to the tying thread and begin wrapping it at the sixty-five percent point, behind the wing. Wrap the dubbing up to the rear edge of the wing.

Step 14
Cross the dubbing to the front of the wing and continue building an egg-shaped thorax as shown at right. You can work the dubbing from the back to the front of the wing as needed to do this with no ill effects. Once the thorax is completed, whip finish and clip the thread at the rear edge of the hook eye. Don’t try to build a thread head, just whip finish and clip for no bulk.

Step 15
Finished fly, side view. Notice how thin the abdomen is, the slight bulk of the thorax and the length of the wing and tails.

Step 16
Quartering front view. Note the arc of the wing. Not really a complete 180 degrees, but more of a V-shape. The standard 180-degree wing is a bit much, I believe, on a pattern like this and this V-shape allows the body to sit lower in the surface film.
