The Dave’s Hopper comes from the vise of uber fly designer Dave Whitlock. Mr. Whitlock may be the most prolific designer in the world at the moment with several what have become standard designs to his credit. Dave’s Hopper is one of the most popular flies in the bins, but one of the harder patterns to tie correctly. The spun deer hair head and collar give many tyers fits, and the knotted legs aren’t all that easy or quick to do either. I fished this fly for many years before I came up with my Charlie Boy Hopper, and can attest that it does indeed catch fish and float well. I find that this fly sits a little low in the water and does become waterlogged after a few fish, thus the reason I started messing around with foam. Nonetheless, the Dave’s Hopper is a great pattern to add to your fly box and tying repertoire. Tie a few up and throw something old school like this the next time you’re out!
Materials Needed:
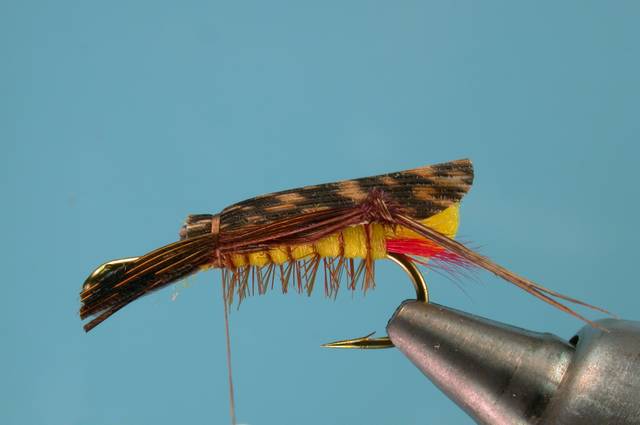
Hook: TMC 5262 #4-12 Thread: GSP 50
Tail: Red Deer Belly Hair
Hackle: Brown Rooster Neck
Body: Yellow Poly Yarn
Wing: Mottled turkey quill, vinyl coated.
Legs: Knotted Ringneck Pheasant Tail Fibers
Head and Collar: Natural Deer Body Hair, spun and trimmed to shape
Step 1
Start the thread about a third of a shank length back from the hook eye and wrap a thread base back to the bend. Cut, clean and stack a small bunch of red deer hair. Measure this against the shank so it is equal to about a third to a fourth of the shank.

Step 2
Tie the tips of the deer hair in at the bend with a couple firm wraps of thread. The butt ends of the hair will flare wildly, but don’t be scared…we’ll fix that in a minute.

Step 3
Lift the butt ends of the red deer hair up and hold them out of the way while you wrap the thread forward to the 3/4 point on the shank.

Step 4
Lay the hair back down on the shank and bind it in place at the front of the hook as shown here. Tie the hair down with a couple tight turns of thread and clip the remaining butts as close as you can. We want the hollow butt ends of the hair as an underbody to add some flotation to the fly.

Step 5
Firmly spiral wrap the thread back to the bend of the hook. Once at the bend, hold the tail in a bunch and wrap back over its front edge to push it just ever-so-slightly down the bend of the hook.

Step 6
Return the thread to the front end of the tail butts and tie in a length of yellow poly yarn. On a bigger fly, like an 8 or 6, you’ll need a whole strand. On a smaller fly, you may need to split the strand into a smaller portion. Wrap back over the poly yarn to the base of the tail.

Step 7
Use the tips of your scissors to loop the yarn around, forming a small loop at the bend of the hook.

Step 8
Tie this loop of yarn down with a couple tight wraps right at the bend of the hook.

Step 9
Wrap forward over the butt end of the yarn all the way up the shank to the starting point and clip the excess. Return the thread to the bend of the hook and notice that the front edge of the underbody is very square at this point.

Step 10
Prepare a brown hackle feather and tie it in by its butt end at the base of the loop. You should have a bit of bare stem showing behind the tie down point on the hackle. The size of the hackle used here is irrelevant, as we will be trimming it down later, so just pick a big one off the neck and use some of that stuff that would otherwise be wasted.
Step 11
Move the thread to the front of the underbody once again and tie in a half a strand of the yellow poly yarn.

Step 12
Wrap back over the half strand of poly to the bend of the hook, anchor it with several tight wraps at the bend and then return the thread to the front of the body.

Step 13
Wrap the poly yran forward from the bend to the front of the underbody forming a smooth level body. Tie the yarn off at the front of the underbody and clip the excess. Overlap the thread up onto the shoulder at the front of the yarn body here.

Step 14
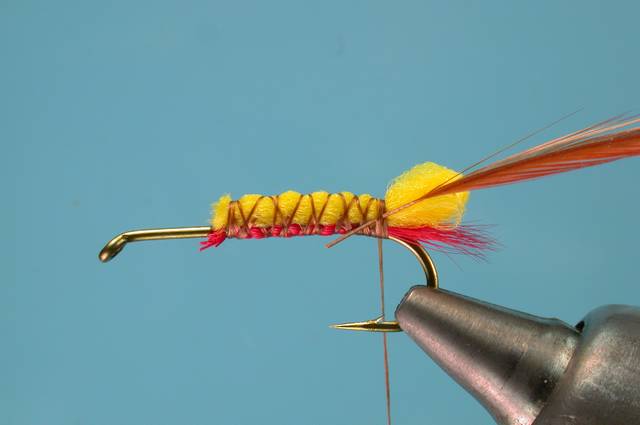
Palmer the brown hackle feather forward over the body with evenly spaced turns and tie it off at where the thread is hanging on top of the front edge of the body.

Step 15
Clip the hackle tip off flush and then trim all the hackle around the fly into short bristles. I trim very close along the top and sides of the fly, but leave the fibers just a bit longer along the bottom of the shank.

Step 16
Cut a slip of turkey tail feather from the quill that is about as wide as the gap of the hook. Coat the feather with a light layer of Vinyl Cement. The vinyl cement will keep the feather from splitting later. Trim the butt end of the feather into a rounded shape as shown here.
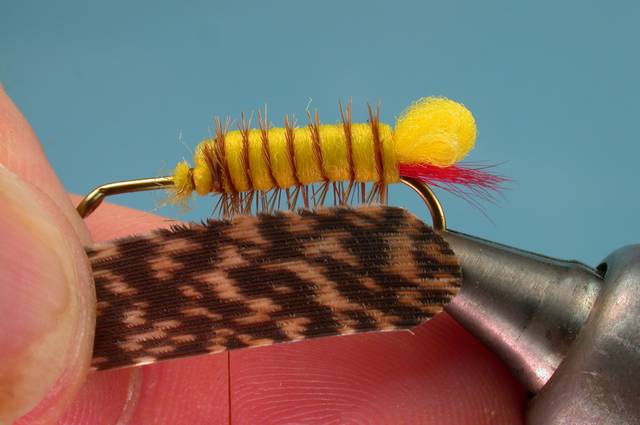
Step 17
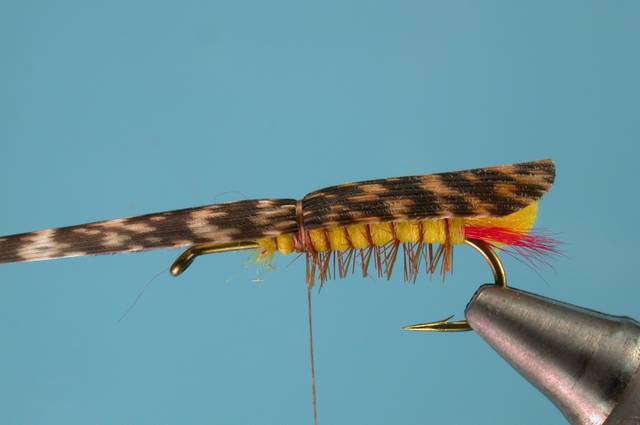
Lay the feather across the top of the body and fold it slightly so it countours to the body shape.

Step 18
Tie the feather in on the top of the shoulder at the front of the body with a couple tight turns of thread. The end of the feather should extend back to just beyond the tail loop. Trim the front end of the feather close.
Step 19
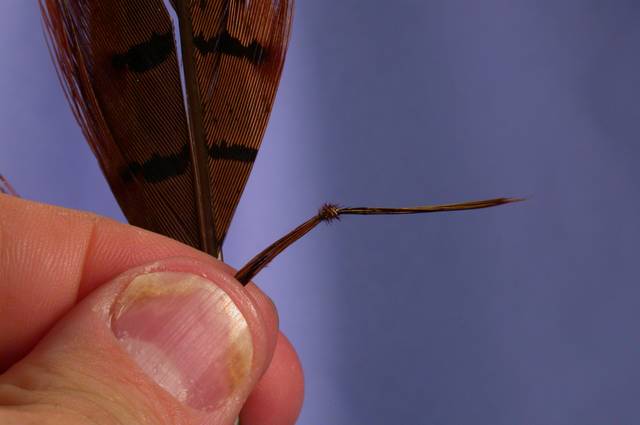
To make the legs for this fly, mount a pheasant tail feather in the jaws of your vise as shown here.

Step 20
Pull about a dozen fibers out from the center quill and lay the knot tying tool over the top of the fibers from the backside. Look closely at the photo here, it’s not very intuitive to do this.

Step 21
Twist the tool and bend the feather fibers so they are bent around the shaft of the tool.

Step 22
Twist the tip of the tool up to catch the tips of the fibers in the closing loop of the tool.

Step 23
Draw the tool out to the right to pull the fibers through the loop forming an overhand knot. Pull the tips of the fibers with your fingertips to tighten the knot down.

Step 24
Peel this leg from the stem and put a light coat of Vinyl Cement along the lower portion, from the knot to the tip. Tie several of the legs at a time to speed up the process. Tie several from the right side of the feather, then turn the feather in the vise and tie several from the other side.
Step 25
Lay one leg in along the near side of the hook, with the knot (knee) at the bend of the hook. Tie this leg in with a couple firm wraps of thread on the front edge of the body. You want to make sure there is a sharp drop off along the front of the body here to help with the collar and head later, so be sure not to slip off the front edge of the body as you tie things in.

Step 26
Position the leg so it lies along the side of the body as shown here.
Step 27
Tie another leg in along the far side of the hook, making sure the knees line up on both legs. Trim the butt ends of the legs close to the shank and then trim the tip ends so they are even. I like the lower leg pretty short so it doesn’t influence how the fly rides on the water.

Step 28
Cut, clean and stack a largish clump of natural deer hair with nice pretty tips. Measure this clump of hair so it extends from the front edge of the body shoulder to about halfway down the wing.

Step 29
Place three turns of thread over each other and the hair on top of the front edge of the body. Do not pull yet.

Step 30
Now Pull! Hold onto the butt ends of the hair and draw the thread firmly toward you to flare the hair in place on the front edge of the body.

Step 31
The hair should now be flare atop the front edge of the body, but not spun around the shank.

Step 32
Pull the butt ends of the hair back and bring the thread down onto the shank at the immediate front edge of the yarn body.

Step 33
Make a thread base on the shank from the front of the body up to the hook eye and back again in preparation for spinning this next bunch of hair. Cut and clean another large clump of hair, but cut the tips off of this one, leaving a short one inch long bunch of butts. Lay the center of this bunch against the front edge of the first clump of hair and make three turns over the center of the hair.

Step 34
Draw the thread firmly toward you as you release your grip on the hair to spin the bunch around the shank. Pull until the thread and hair are anchored to the hook shank.

Step 35
Pull the butt ends of the second bunch of hair back and work the thread forward to the front edge of the hair.

Step 36
Cut and clean another like-sized bunch of hair as you did with the second bunch. Lay this bunch in with its middle against the front of the last bunch of hair. Place three taut turns over the hair at its center.

Step 37
Draw the thread tightly toward you to spin the hair around the shank. Work the thread through the hair to just behind the hook eye. Pull the hair back out of the way and whip finish and clip the thread.

Step 38
Use half a double edged razor blade to trim the bottom of the hair head flat.

Step 39
Trim the sides of the head flat by pushing the blade from the front of the head to the back. Be careful not to cut off too much of the hair tips in the collar.

Step 40
Trim the top of the head flat across the top forming a square shaped head. Again, be particularly careful not to cut the tips of the hair in the collar off. Use your scissors to clean up the edges and loose ends if needed.
