There are few fly patterns these days that truly catch my attention, and it’s not always because I am so discerning. Sometimes a fly is so craftily conceived that I overlook it merely because at first I don’t understand it. Tommy Lynch’s Drunk & Disorderly streamer is precisely one of those flies.
I recall stealing a peek into one of Blane Chocklett’s gigantic fly boxes at the International Fly Tying Symposium a few years ago. Jay Nichols and I were having a drink in the hotel lobby, and Blane joined us to deliver a few sample flies for Jay to photograph for his new book. I hadn’t met Blane before, but was a big fan of his work. While I stayed quietly out of their conversation, I eyeballed Chocklett’s fly box. I was at first disappointed to see that the flies were not Blane Chocklett original patterns but Drunk & Disorderly streamers. My stolen glances showed me a fly that was oddly shaped, and after all the hype I’d heard about Blane, I thought he could have done a better job finishing the head. Boy . . . do I feel like a jerk now. As it turns out, I didn’t even understand what I was looking at.
A year later, Jay proposed that I add the Drunk & Disorderly to my own upcoming book on tying streamers, so I took a closer, more educated look at the pattern. I quickly learned that the wedge head of the D&D is tied that way in order to create a specific swimming action. It’s an articulated fly, and the front hook is a 60-degree jig hook with a spun deer-hair head tied long and sparse on the downward-sloping front end. In other words, creator Tommy Lynch has designed a fly with a built-in lip similar to a Rapala lure. I now have to admit that my first impressions of the D&D were completely wrong, and I should have asked a few questions before forming an opinion.
What I first viewed as a sloppily tied and perhaps poorly conceived fly pattern has whipped around and karma-kicked me square in the chops. The Drunk & Disorderly, as it turns out, is one of my favorite types of flies—one that on closer inspection turns out to be so much more than I thought.
While the exact dressing of the fly can be changed and tailored to your own needs, the unusual head shape and placement are paramount to the design of the fly. Lynch masterfully tied the D&D with the loosely spun head placed on the downward-sloping front end of a jig hook to create a planing surface that creates turbulence for the articulated body, causing it to glide, dive, and pause, as well as tip and yaw on the retrieve. Coating the finished head with a generous dousing of Solarez Thin stiffens it up and helps to retain the shape even when it’s thoroughly soaked.
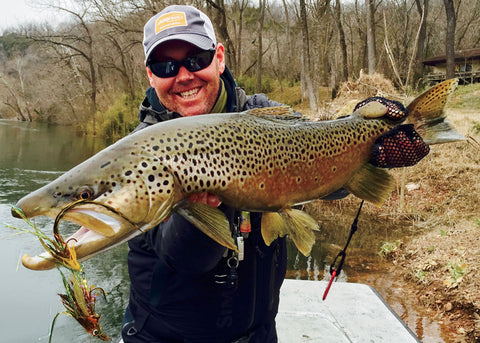
It is this very head shape and placement that sets the D&D apart from other streamer patterns, and the resultant swimming action is unlike anything I have seen before. Judging by the number of grossly oversized fish I have seen where the trout have some version of this fly dripping from their maws, I’d say Lynch is on to something.
I’ll be the first to admit that this fly does creep harrowingly close to the school of tying that implores tiers to add every conceivable trigger to the pattern in an attempt to cover all the bases. While I tend to lean more toward patterns that are sparsely designed and easily cast, I cannot argue with the efficacy of the D&D, and in the process I’ve again learned that it is almost always better to keep your mouth shut and listen before spouting off with an opinion before you know the facts.
With a Flashabou or saddle hackle tail mounted on the rear hook, then followed by UV Polar Chenille and rabbit strips, then topped with a large mallard flank feather à la a Zoo Cougar, the rear half of the D&D is an entire fly in its own right. Tethered to the front hook—in this case, an extra-heavy-wire, large-gap Gamakatsu 60-degree jig hook—with a wire connection and beads, the terminal end is then dressed with more of the same materials but gets the addition of a glass rattle on the inside of the body.
I think of flies like this as the obvious fat guy at the buffet line in Las Vegas, loading his plate with everything in sight . . . and this sort of thing has always bothered me. Does anyone really need two steaks and a pound of mashed potatoes? In the case of the D&D, those two steaks take on the form of the articulated body, and everything else is the gravy. Oh yeah, the obese brown trout we all dream about is the fat guy. Yeah, sometimes piling it on is just what they want.
Materials Needed:
Rear Hook: #1/0 Daiichi 2461
Thread: Black 3/0 Danville Monocord
Tail: Gold grizzly Flashabou
Body: UV gold Polar Chenille
Collar: Sand variant rabbit strip
Wing: Mallard flank feather dyed wood duck gold
Connection: 30-pound-test wire
Beads: 6 or 8 mm solid plastic
Front Hook: #3/0 Gamakatsu 61413 jig hook
Finishing thread: Kevlar or GSP 200, natural color
Front tail: Gold grizzly Flashabou
Body: Sand variant rabbit strip
Rattle: 3 mm Pyrex Rounded End Fly Rattle
Mid-Body: UV gold Polar Chenille
Sides: Mallard flank feather dyed wood duck gold
Front Wing: Gold grizzly Flashabou
Collar: Sand variant rabbit strip
Head: Dyed brown deer body hair
Eyes: Living Eyes, ¼" diameter, color of choice
Coating: Solarez Thin or Ultra Thin
Mount the rear hook in the vise and dress the shank from the eye to the bend and back again, to hang the thread even with the point of the barb. Clip a generous clump of Flashabou at least twice as long as the shank. Tie in this clump at the center of its length with a tight, narrow band of thread. Double the front ends of the Flashabou back over the top of the hook and wrap the thread over the fold to anchor the clump in place.

Bump the thread forward to the hook point and tie in a length of Polar Chenille. I treat this material like hackle and tie it in by the butt end with the fibers lying back toward the hook bend. Palmer the Polar Chenille forward up the hook shank to about the 75% point. Use a wire brush to sweep the fibers back after each turn. You can do this with your fingers too, but keep in mind there is a very sharp hook point in there and eventually you will find it. Use the brush. Stop being stubborn.

Tie in a rabbit strip with the grain of the fur flowing toward the bend of the hook. Move the thread forward to about an eye length behind the hook eye and palmer the rabbit strip forward. Wet your material hand fingers slightly and stroke the fur back toward the bend after each wrap to prevent trapping any errant fur. At the eye, part the fur to expose the hide and make several firmly stacked turns of thread just behind the hook eye to tie off the rabbit strip. Clip the strip as closely as you can and build a smooth thread head over the leftover nub.

Pick out a nicely marked and dyed mallard flank feather with a somewhat thick quill. It should reach from the eye to just past the bend of the hook. Strip the excess fibers from the base of the feather, exposing the stem. Place the feather flat over the top of the fly so that its natural curvature encompasses the body. Place your index finger on your material hand on top of the feather just behind the tie-in point. I don’t tie the feather in only by its bare stem, I include feather fibers as well for greater durability.

Anchor the base of the feather with a band of thread, then fold the butt end of the feather stem back over the top of the fly and make several more wraps of thread over the folded butt end. Build up a smooth, nicely shaped thread head and whip-finish.

Mount the front jig hook and cover the shank with a cross-hatched layer of thread. Tie in a 5- or 6-inch length of wire, covering it with thread all the way back to the bend of the hook. Slide two hard plastic beads onto the wire. Pass the wire up through the eye of the rear hook. Push the loose end of the wire forward again through both beads. Draw this wire loop down until the loop at the eye of the rear hook is just a bit bigger than the hook eye itself. Capture the front end of the wire with the thread at the bend of the hook and wrap forward over it to where you originally tied it in. Wrap back again to the bend, covering the wire with a secure layer of thread. Clip the wire and coat the wraps with head cement or Zap-A-Gap.

Cut another large clump of Flashabou and tie it in as you did for the tail on the rear hook, just above the hook point. Tie in the rest of the rabbit strip by its head end just on top of the flash fold. Make sure the rabbit is cinched down tightly.
Make three forward turns of rabbit, then part the hair and tie off over the hide only. Clip the excess rabbit strip. Tie in another length of Polar Chenille by the butt end so the fibers will sweep back when wrapped. Drape the Polar Chenille back over the fly and out of the way.

Place a glass rattle on top of the shank with the back end on top of the rabbit strip. Bind the rattle with many secure wraps of thread at the center of the rattle, leaving the swelled ends exposed as shown here. Coat the thread with Zap-A-Gap.

Wrap the Polar Chenille forward over the wet glue on the rattle wraps, brushing the fibers back with each successive wrap. Once you reach the front of the rattle, tie off the Polar Chenille and clip the excess. Sweep the remaining fibers to the rear and build a smooth thread head over the butt ends.

Trim the fluff from the bases of two feathers so they reach from the tie-in point to just past the eye of the rear hook. Tie in the first feather flat along the near side of the fly with a tight band of thread directly over the Polar Chenille tie-off. Tie the other prepped feather on the far side. These two feathers should sandwich the body of the fly between them with the insides of their curvatures facing the body of the fly. Clip the excess stub ends of the mallard flank feathers and form a smooth head over the tie-off area.

Cut a smaller, longer bunch of Flashabou. Place this clump at the front of the existing body section. The rear tips should align with the tips of the previous Flashabou clump. Bind down the center of the Flashabou clump with a narrow band of thread, fold the front end of the flash back over the top of the fly, and pull the whole bunch taut and slightly upward as you wrap the thread over the fold to bind it all in place.
Tie in another rabbit strip by its head end right on top of the flash and mallard flank. We have a limited amount of space, so be diligent about stacking these materials judiciously. Bump the thread slightly forward and begin wrapping the rabbit strip with the first turn on top of the tie-in area. Make a second turn over the top of the first turn, stacking the hide in a neat cylinder. It helps to brush the fur back as you wrap to keep it from looking like a disheveled mess. Part the fur on the rabbit strip and tie it off with a tight, narrow band of thread. Clip the excess strip as closely as you can. Whip-finish and clip the thread, then add a drop of head cement to the wraps.

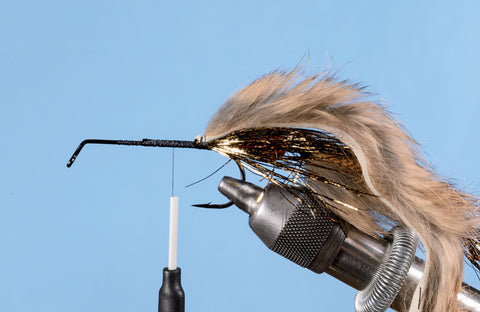
Start the Kevlar thread and dress the front of the shank all the way to the eye of the hook and back to the rabbit strip. Cut, clean, and stack a clump of deer hair. I probably use more than is necessary in these photos. Less hair makes a fly that sinks a bit better, and more hair causes the fly to be more neutral density. Measure this clump of hair so the tips extend nearly to the end of the rabbit fur collar.

Stack two turns of thread over the hair at the front of the rabbit strip. Pull down firmly on the thread to begin flaring the hair. As the thread tension increases, slowly release your grip and allow the clump to spin around the shank. Spiral-wrap the thread forward through the butt ends in small increments to completely flare the hair.

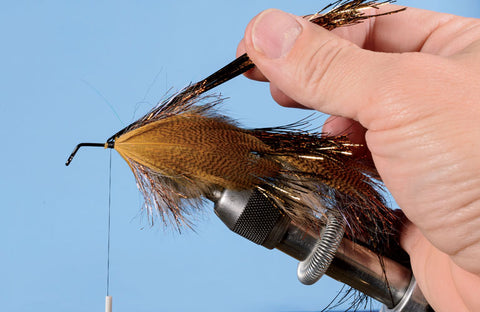
Cut and clean another clump of hair, but this time, cut the tips of the hair off about halfway down, leaving only the thicker bases of the hair to make the process a bit tidier and give you a better view of the thread wraps. Place the center of this clump even with the front of the previous clump, holding it in your thread hand so you can butt it up tightly to that previous bunch.

Make two turns of thread and spin the hair as in the previous step. Firmly push the hair back against the first bunch. Don’t use a hair-packing tool here, as you came equipped from the factory with a convenient set of hair-packing digits right there on your hand. Work the thread forward with the same spiraling wraps you used before, leaving a bit of available shank left at the front of the hook.

Use your thread hand to hold the final clump of hair on the downward-sloping section of hook shank, and use your material hand to make the first two thread wraps. Release the butt ends and let the bunch spin around the hook exactly as before. Use your fingertips to sweep the hair back, and work the thread forward to the eye. I whip-finish by hand because it gives me more control of the placement of the thread turns. Clip the thread.

Hold the fly in your fingertips. Press a double-edge razor blade flat against the bottom of the head just behind the eye. Make one smooth cut back to the front of the collar to flatten the bottom of the head. Leave some of the natural hair tips on the bottom of the fly to form the bottom of the collar.

Turn the fly over and place the blade flat against the top of the head at an angle that matches the slope of the front of the hook shank. Push the blade back through the hair, forming a wedge shape. Tommy Lynch says the finished head should look like a door stop.

Bend the blade it into a curve and push the curved section against the previous cut to cup the top of the head. Think of taking a “scoop” out of the head to create a trough.

Use both scissors and the blade to complete the head. There should be a definite wedge shape, although the outside has some room for interpretation.

Dab a generous gob of Solarez Flex Formula where you want your eyeball. Let the Flex Formula ooze down into the hair, and then press on a Living Eye. I cure the Solarez by shining the UV lamp through the eyes, so it’s important that the eyes are transparent. Repeat the process on the other side.
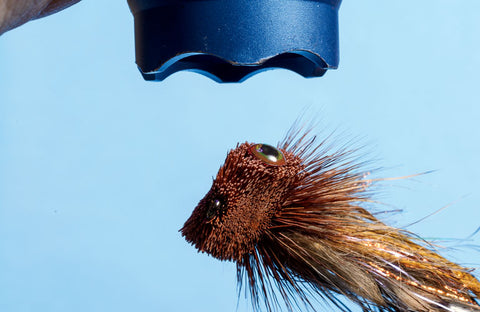
Generously coat all the surfaces of the head and over the eyes themselves with Solarez Ultra Thin. Cook the whole thing with the UV lamp. This final coat hardens the head and creates a more rigid lip to accentuate the diving motion.
