This pattern belongs to Ben Furimsky. He developed this fly for the Gunnison River and after several years of seeing it around the MFC catalog, Ben gave me a couple last year. I stashed them in my fly box and they proved to be just what the doctor ordered earlier this spring on the Rio Grande here in southern Colorado. The fly floats very well, given its heavy wing and hackle as well as the foam body. That tall wing makes the fly very easy to see too. This fly has a craftily formed extended body and tail combination, but once past that the fly is quite simple to tie. Even the body is fun to learn and goes pretty quickly once you get the idea.
Materials Needed:
Hook: TMC 100SP-BL or 2487 #10-14
Thread: UNI 8/0 Olive Dun
Body: Gray Fly Foam, 1/8th inch
Tail: Black Calf Tail Hair
Hackle: Olive Dyed Grizzly Saddle
Thorax: Peacock Herl
Wing: Blue Dun McFlylon
Step 1
Mount a standard sewing pin in the jaws of your vise as shown here.

Step 2
Start the tying thread as close to the taper on the end of the pin as you can. Use five wraps of thread to anchor the jam knot and be sure to leave a long tag end.

Step 3
Cut a small clump of calf tail and just even the tips up with your fingers by pulling out the short and long hairs. Measure these so they are about a half shank length long. Yes, you’ll have to eyeball this measurement to the hook we’ll be using later for right now. Tie the calf in on top of the jam knot where you started your thread with five tight turns of thread.

Step 4
Clip the butt ends of the calf as close to the thread wraps as you can. Note the tag end of the thread is lying along side the pin.

Step 5
Cut a strip of foam from the sheet that is about 1/8″ square.

Step 6
Cut the end of the foam as square as you can and pay it in against the base of the tail so it just barely overlaps the thread hanging with the bobbin.

Step 7
Catch the very end of the foam with two firm wraps of thread, one over the top of the other.

Step 8
Lift the foam strip up and move the thread down the pin a bit by making a couple widely spaced turns.

Step 9
Lay the foam down against the pin again and make a couple more tight turns of thread to create the next segment. The strip of foam will sort of cup around the pin shaft as you wrap over it. In this photo I have made two segments, lifting the foam and advancing the thread up the pin between each.

Step 10
Make two more segments moving down the pin as you did for the first two. I make these last couple segments just slightly bigger than the first two to help taper the body. Whip finish the thread on top of the segmenting wraps of the last section. Clip the working thread.

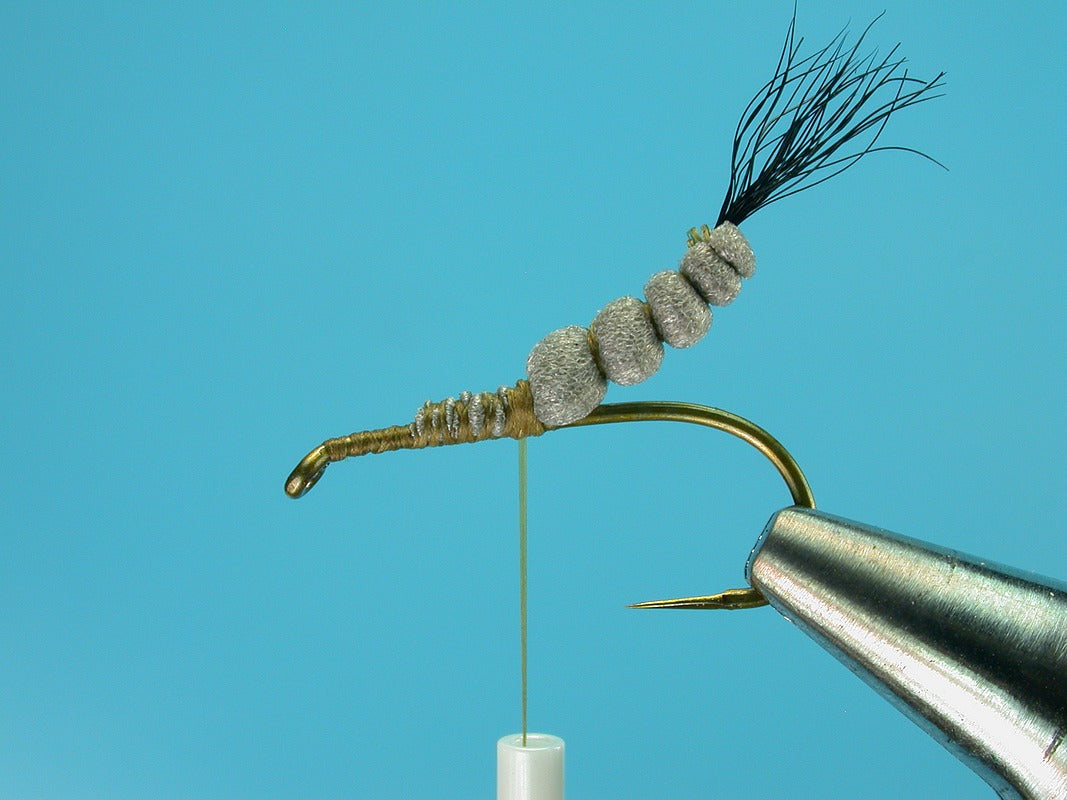
Step 11
Ought to have something that looks like this right now. Note the long tag end of the thread is hanging out of the end of the body. This will be important in a minute here.

Step 12
Grab the body tightly in your fingertips and slide it off the tapered end of the pin.

Step 13
Once you pull the body off, you’ll have some loose thread wraps in the space where the pin used to be. Fear not.

Step 14
Hold the body in one hand and pull on the tag end of the thread that is hanging out of the end. As you draw this strand of thread tight, you’ll see the thread wraps at the tail end of the body tighten up and work their way down the body, cinching everything tight from the inside out.

Step 15
Here’s a close up of the body after we tightened things up. As you draw that thread tight it will also curl the body a bit, creating a nice curve.

Step 16
Here’s the side view showing the curve.

Step 17
Place the hook in your vise and start the thread right behind the hook eye. Wrap a thread base back to just in front of the hook point.

Step 18
Lay the body in on the hook with the curve going up. Tie the body to the shank with several tight turns of thread right on top of the last segmenting band on the foam. Be sure to catch the tag end of thread along with the foam as you tie this down

Step 19
Lift the end of the foam and the tag end of the thread and advance the thread slightly forward on the hook shank.

Step 20
Bind both the foam and the tag end down once more to the shank. Clip the excess foam and thread flush.

Step 21
Wrap back over the foam to the base of the body, leaving just the four segments extending off the back of the shank. Smooth the thread base out for the thorax to come.
Step 22
Prepare and tie in an olive grizzly feather at the base of the body.

Step 23
Tie in a half dozen peacock herls by their tips and wrap back over them to the base of the foam body. Return the thread to a couple eye lengths behind the hook eye.

Step 24
Wrap the peacock herl forward forming a level, yet robust thorax. Tie the herl off behind the eye and clip the excess.

Step 25
Palmer the hackle forward through the thorax with several tightly spaced turns. Don’t be afraid to really pack some hackle in there.

Step 26
Trim the tip of the hackle flush and then cut a clump of McFlylon from the hank. I usually use a bit more than one strand, but not quite two whole strands..maybe one and a half strands, or one and three quarters, maybe even one and five eighths of a strand, but two strands seems to be entirely too much. Lay this clump in against the front of the hackle as shown here. You can see that you needed to plan on leaving some extra space behind the hook eye and I should probably have reminded you of this earlier, but…I didn’t. Haha, joke’s on you.

Step 27
Tie the McFlylon in behind the hook eye with a narrow band of tight thread wraps. Make sure the wing is centered on the shank.

Step 28
Lift the front ends of the McFlylon up and make several tight turns of thread butting up against their bases to prop them up off the hook eye.

Step 29
Return the working thread to the thread band at the base of the wing.

Step 30
Clip the front end of the McFlylon clump about a hook eye length out from the eye and whip finish the thread. Lift the wing up at a forward angle and lay your scissors in along the back of the wing. Trim the wing to a taper from the bottom to the top.

Step 31
Run an olive marker up each side of the body. Our Drakes do have a bit of green on them, as well as a bit of brown, but are overall more of a pale gray color in most cases. Of course, you are welcome to start with whichever color foam you like.

Step 32
Add a brown stripe to each side too.

Step 33
Add a drop of head cement to the thread head as well as the tip of the foam body. Try to hold the applicator real still when you take the picture instead of bouncing it around like I did here.

Step 34
Turn the fly over and cut a notch out of the hackle collar on the bottom of the fly, leaving a wide V-shape as shown here.

Step 35
Side view.
