The Gurgler, or, more correctly, the *Gartside* Gurgler was developed my angling ranconteur, Jack Gartside. A simple top water pattern at home in front of everything from bluefish to bass, the Gurgler is a fly that even a novice can tie. While not really a “popper” or a “slider”, the Gurgler has a unique action that *gurgles* and sputters along the surface, drawing attention and strikes from a variety of game fish. While the pattern I’ll present here is tied on a saltwater hook, there are a variety of fresh water hooks appropriate as well for warm water fishing. Get on it…this one is easy…
Materials Needed:
Hook: TMC 811S #1/0-6
Thread: 140-280 Denier UTC thread, in this case red, but to your liking
Tail: White Bucktail
Flash: Pearl Krystal Flash
Shellback: White Open Cell Foam, 1/4 inch thickness
Hackle: Grizzly Neck Hackle
Body: Pearl Tinsel Chenille
Step 1
Place the hook in the vise and dress the shank with a layer of thread from the hook eye to the bend and back again. Coat the thread wraps with a light coat of head cement.

Step 2
Cut and clean a small clump of bucktail. Even the tips by pulling out the short and the long fibers but do not stack it…we want this a little tapered and ragged on the ends. Measure the clump against the hook so the tips extend beyond the hook bend about two shank lengths with the butt ends just behind the hook eye.

Step 3
Cut the butt ends of the bucktail square and tie them in with several tight wraps of thread about two eye lengths back from the hook eye. I like to spin my bobbin up to twist the thread a bit before doing this so the thread will cut in and grab the hair tightly.

Step 4
Lift up the long ends of the hair to keep them on top of the hook as you spiral wrap the thread tightly back over them to the bend.

Step 5
Ought to have something that looks about like this right now.

Step 6
Tie in three or four strands of pearl krystal flash at the center of its length at the base of the tail. Fold the front ends back over the tail and trim the ends to random lengths about even-ish with the end of the tail. Leave some long, some shorter and some in between so they don’t look like a paintbrush…or cut them all square, I don’t care, I’m not your mother.

Step 7
Mom says like this…

Step 8
Wrap forward over the butt ends, covering them tightly with thread. Coat the wraps with head cement.

Step 9
Cut a strip of 1/4″ foam to just slightly narrower than the hook gap.

Step 10
Fold the end of the foam around the hook so it cups to the shank about three eye lengths back from the hook eye.

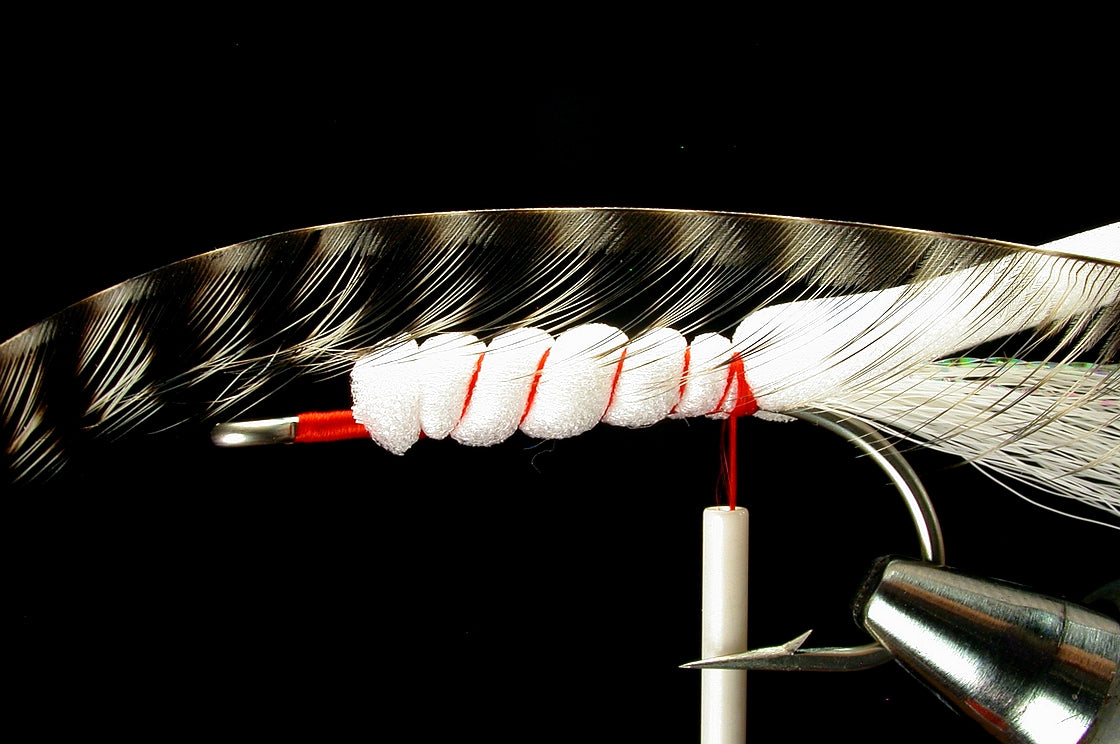
Step 11
Make a single turn of thread over the foam, but don’t tighten it until you come all the way around and pull straight down. Hold the foam in place on the top of the hook as you do this then follow up with a couple more tight wraps stacked on top of the first.

Step 12
Spiral wrap the thread back over the foam to the bend, anchoring it with a band of thread when you get there.

Step 13
Select a large grizzly neck feather and preen the fibers so they stand out away from the stem.

Step 14
Peel the fibers off the inside of the feather…that is, the side that will touch the hook when you wrap it around the shank. We’ll be tying this feather in by its tip so that ought to help you visualize which side to strip
Step 15
Tie the grizzly feather in by its tip at the bend of the hook and clip the excess tip after anchoring it flush.

Step 16
Tie in a length of pearl krystal chenille at the bend of the hook with a few tight turns of thread.

Step 17
Return the thread to just in front of the foam behind the eye.

Step 18
Wrap the chenille forward and tie it off at the front of the foam strip. Clip the excess.

Step 19
Build a smooth thread base behind the hook eye.

Step 20
Wrap the hackle forward in an open spiral to the front of the chenille body and tie off. Clip the excess and wrap firmly over the stub end.

Step 21
Preen the hackle fibers down from the top to each side and….

Step 22
Pull the foam forward over the top of the shank, slightly cupping it around the body.

Step 23
Unwind the bobbin to make sure the thread is flat and make a single turn over the top of the foam. While pinching the long end of the foam just behind the hook eye, tighten the thread wrap by pulling firmly and steadily down. Make two more wraps on top of this wrap to anchor the foam.

Step 24
Lift the front end of the foam and build up the thread head a bit, pushing the foam slightly upward.

Step 25
Clip the front end of the foam straight across, leaving a bit of length to form the gurgling lip.

Step 26
Bring the thread back into the notch and whip finish.

Step 27
Finished fly, side view.

Step 28
Front view
