Pattern Description:
I came up with the GTH Variant this summer after floating the Eagle River outside of Wolcott, Colorado with a good friend of mine. The Eagle is an under-rated river that holds a surprising amount of fish. The fish were all healthy, perfect specimens as well, and they rose freely to a variety of attractor type dries. Lime Humpies, H&L Variants, Goddard Caddis and the like were the order of the day, and in the afternoon during a rainstorm, I even managed a couple fish on a Royal Wulff. I know the Wulff doesn’t surprise most of you, but I can honestly say these were the first fish I had caught on an RW since I was a kid! I guess the fly just doesn’t appeal to me that much and thus I don’t use it too often. One thing I re-noticed about the RW is the amazing visibility it affords the angler, especially in low light conditions. Once I got home, I got to thinking about combining some of the attributes of the Lime Humpy, H&L, and the Royal Wulff. The result is now known as the Go to Hell Variant. This pattern uses the white calf body hair wings of the Royal Wulff, the white calf body hair tail and body profile of the H&L, and the lime coloration of the Humpy. I added an Adams hackle collar of mixed brown and grizzly hackle, slightly oversized to really stand the fly up in the broken water. The pearlescent Mirage tinsel tag was added because it’s just so easy and really can’t hurt, and it adds a nice bit of sparkle to the pattern. This pattern is a bit complicated for beginning tying skills but uses some pretty straightforward techniques that should come easily from other patterns on the site. Tie some of these up and see what you think.
Materials Needed:
Hook: TMC 100SP-BL #10-18
Thread: 10/0 Chartreuse Gudebrod
Wing: White Calf Body Hair
Tag: Pearlescent Mirage Tinsel, medium
Tail: White Calf Body Hair
Abdomen: Flo. Green 70 Denier UTC tying thread
Thorax: Black Peacock Ice Dubbing
Hackle: Brown and Grizzly Mixed, I like Whiting Saddles here as they provide a really dense collar.
Step 1
Start the 10/0 thread immediately behind the hook eye and wrap a thread base back to the fifty percent point. Return the thread to the seventy-five percent point and let it hang there.
Step 2
Cut, clean and stack a largish clump of calf body hair. As this fly is meant for broken water, you want a relatively heavy wing in relation to the size of the fly. Measure the stacked calf hair against the shank so it is equal to the shank length.
Step 3
Move the measured (one shank length) butt ends of the hair forward to where the thread is hanging (75% point) and bind the clump down on top of the hook with a wide band of thread as shown. Make the wraps that form the band from the front to the back so as not to disrupt the finished wing length.
Step 4
Pull the butt ends of the hair above the hook and cut them at a low angle along the shank to taper them smoothly down to the hook. This step will help to smooth out the wing/tail/body junction that is to come.
Step 5
Detail of the hair butts after trimming. Notice how the butts are staggered in length down to the shank of the hook.
Step 6
Build a smooth thread base to cover the butt ends of the hair that tapers down to the bare shank behind the butts. Continue wrapping a smooth thread base all the way back to the bend.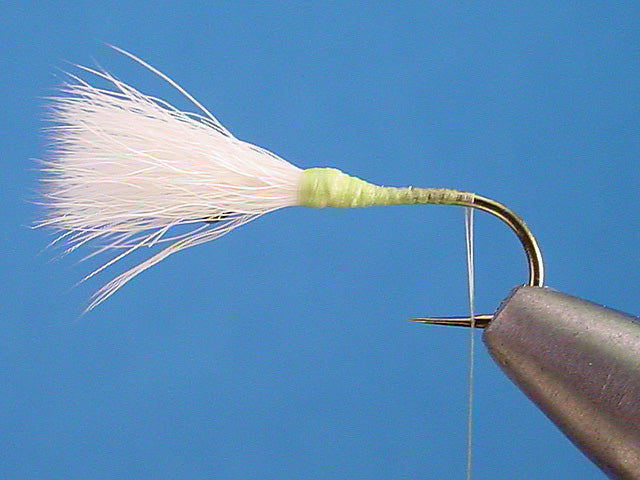
Step 7
Tie in a three-inch length of pearl Mirage tinsel at the bend of the hook. Bind it down right on top of the hook bend with a couple turns of thread.
Step 8
Begin wrapping the tinsel BACK down the bend, behind the hanging thread. Make about three turns of tinsel traveling down the bend…
Step 9
…then wrap over those turns to bring the tinsel back up to the top of the bend. You have simply made a double layer tinsel tag.
Step 10
Tie the tinsel off at the top of the hook bend, right where you started it, and clip the excess.
Step 11
Cut, clean and stack another, smaller clump (about half the size of the first clump for the wings) of calf body hair for the tail. Measure this clump against the wing, which has been previously measured to the correct length of one shank length. The tail should be one shank length as well.
Step 12
Transfer the tail clump to your material hand and hold the butts against the shank at an angle while you make a couple turns of thread over them. Holding the hair at an angle while you wrap will allow the thread torque to pull the hair atop the shank as you wrap over it.
Step 13
Continue wrapping forward over the butt ends of the tail hair up to the tapered base of the wing clump. You should now start to see how the butt ends (of the wing and the tail) will meld seamlessly together.
Step 14
Cut the butt ends of the tail clump by laying your scissor tips parallel to the shank and clipping them off flush. The butts should match up with the angle of the wing butts to provide a smooth taper as shown.
Step 15
Wrap forward over the butt ens of the tail to form a smooth thread underbody, with a slight taper.
Step 16
Pull the wings back along the hook shank between your material hand thumb and forefinger while you build a thread dam against the front edge of the wing to prop it up. The thread dam needs to be pressed right up against the base of the wing to create the lift for the wing.
Step 17
Here is the wing after the thread dam has been completed. The dam does not need to prop the wings up to ninety-degrees, necessarily, just enough to stand them up at close to a right angle.
Step 18
Make another thread wrap around the back of the wing to gather any unruly hairs into the main clump. You may need to make a couple of slightly angled wraps to gather all the hairs.
Step 19
Divide the wing clump into two equal halves on either side of the hook shank. Make eight or turn diagonal wraps from the back of the near clump to the front of the far clump to begin the wing division process.
Step 20
Make a single turn of thread completely around the hook shank behind the wings to prevent the thread from influencing the wraps on the near wing.
Step 21
Bring the thread to the front of the wings again and make eight or ten more turns, this time, from the front of the near wing to the back of the far wing. All you are doing here is making a series of X wraps to divide the wings.
Step 22
Take another single turn of thread around the hook as insurance before moving on.
Step 23
Post the far wing by wrapping the thread around the base of the wing. I like to make the wraps in a clockwise motion when viewed from the top of the wing. Make the thread post high enough to gather all the fibers into a single clump, but not too high. Make another wrap around the hook to lock these wraps in place.
Step 24
Post the near wing in the same fashion as the far wing. I make these wraps in a counter-clockwise direction, so as not to pull the wings together. The thread tension will pull the wing in the direction of the thread pull, so switching directions on each wing helps to separate them. I also tilt the angle of the vise jaws to facilitate easier viewing and to allow gravity to work for me…another reason for a vise with a rotary feature.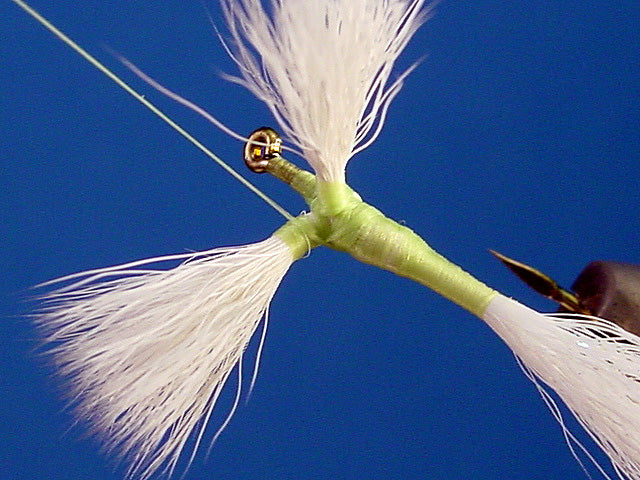
Step 25
The wings should now be divided into two equal clumps and gathered together with the posting wraps as shown here.
Step 26
Bring the thread back to the base of the tail and make a single turn of thread over the top of the shank and come up between the tail and the hook. This wrap will elevate the tail and cock it up nicely.
Step 27
The turn of thread around the base of the tail results in the tail angle shown. Propping the tail up slightly classes up the fly and assures that it will always land right side up.
Step 28
Move the thread forward to just behind the eye and whip finish it.
Step 29
Clip the thread and apply a heavy drop of head cement to the thread wraps. Coat the entire fly, from the eye to the base of the tail (not the wings or tail themselves, though), being sure to cover the bottom of the tinsel tag and the thread wraps at the bases of the wing
Step 30
Start the 70 Denier Flo. Green thread at the midpoint on the shank.
Step 31
Build a smoothly tapered thread abdomen from the base of the tail to the sixty-five percent point on the shank. Whip finish the 70 denier thread at the front of the abdomen.
Step 32
Apply another coat of cement to the newly applied thread abdomen.
Step 33
Re-attach the 10/0 thread at the front of the abdomen.
Step 34
Apply a thin, short layer of the Ice dubbing to the thread. Begin wrapping the Ice Dubbing at the front of the abdomen and travel back toward the bend from there…
Step 35
…forming a short ball-shaped thorax. Be sure not to let the dubbing creep forward into the hackle area. The dubbing is taking the place of the peacock herl on an H&L Variant if that makes any sense…
Step 36
Select and prepare a brown and a grizzly hackle feather. The feathers should have fibers equal to at least one and a half hook gaps. Strip the butt ends of the feathers and lay them with the inside of the grizzly feather facing the outside of the brown feather, or vice versa, it doesn’t really matter whch one is where. Tie the feathers in at the same time at the front edge of the thorax dubbing with the inside of both feathers toward the shank of the hook. Notice that the stripped portion of the quills extend to just behind the hook eye.
Step 37
Wrap forward over the stripped quills up to the eye of the hook and back again to the front edge of the thorax. Return the thread to the hook eye once more, forming a smooth thread base for the hackle and tightly securing it as you go.
Step 38
Grasp both hackles in your fingertips and wrap them at the same time. Make three turns behind the wings and at least two more in front. This will give you a total of at least ten wraps of hackle (2 feathers X 5 turns=10). Tie the feathers off at the rear edge of the hook eye by pulling them nearly straight up above the hook and crossing over the quills with the thread. It makes a big difference which angle you hold the hackle feathers at when you tie them off. A steep angle allows the thread to capture the quill only, while a low angle makes the thread catch some of the individual hackle fibers, resulting in a messy tie off area.
Step 39
Build a smooth thread head to cover the stubs of the hackle feathers and whip finish the thread at the eye. Apply another drop of head cement to the thread head.
Step 40
Finished Fly, frontal view. Notice the angle of the wings and the length of the hackle in relation to the wings.
Step 41
Quartering front view.
Step 42
Quartering rear view.