The Hair Diver is my first attempt at a photographic hair fly tutorial. I can say that this has been the most difficult pattern I have tried to demonstrate photographically as both the pattern itself is complicated and the photos are more challenging because of the larger fly size.
I am often asked to tie hair flies for tying demos. I believe hair flies are some of the most fun you can have with hooks and thread. They are indeed challenging and there is a lot to keep track of during the process but my love for tying them has produced a few tricks that may make your tying a bit easier.
I will demonstrate how to tie in a monofilament loop-style weed guard and the proper way to tie it off. Keeping the weed guard in line with the hook point is of paramount importance, as it won’t function any other way. The trick I show here assures the guard always lines up right.
I have merely skimmed over the tail portion of the fly in this tutorial as it is tied exactly the same (skipping the bucktail foul guard) as the Keys Style Tarpon Fly found elsewhere on the website. If you are not familiar with the steps for the tail and collar assembly check out the tarpon fly and come back to this one afterward.
One of the most useful tricks I’ve developed for tying hair flies is the use of a simple plastic “hair guard”. It works like the old style hackle guards, in that it holds the initial bunches of hair out of the way while we go on with the rest of the fly. I use this guard on a Diver to hold the longer collar hair back while flaring and stacking the rest of the head. It is used on both a Diver and a Popper to hold the ‘face’ back while completing the weed guard tie down. I use a piece of heavy lead wire to hold the hair and plastic guard in place during the tying process. This guard assembly can be manipulated and removed easily when the time comes.
Another point I need to make here is that while most people think of hair bugs as spun deer hair flies, I have better results with simply flaring and stacking the hair in place. ‘Flaring’ the hair means compressing the bunch in one place on the hook without allowing it to spin completely around the shank. ‘Stacking’ is layering and flaring another bunch of hair directly over the first (or second) bunch, to create density and, in most cases, color variation. This process allows me to lash incredibly large amounts of hair to the hook (the secret to creating beautifully trimmed, durable flies) and control the density and colors of the bug. By varying the size and color of the hair clumps you can create mottled patterns, stripes, and dots. Spun hair only allows bands of color.
Loosely spun hair bugs don’t hold their shape like tightly packed flies and are not as durable. I use very large clumps of hair in each flared and stacked bunch to attain super density bugs. Most of my bugs have between nine and fifteen separate bunches of hair making up the head. These large clumps are necessary to create the density and evenness needed for a durable, buoyant fly. The floatation of a densely packed bug is far superior to that of a spun hair pattern.
Stacking large clumps of hair and packing them tightly are just some of the keys to producing immaculate bugs. Deer Hair Master, Tim England is responsible for another trick I commonly use. Tim steams his hair bugs over a kettle of boiling water after the initial trimming. It only takes about thirty seconds in the steam bath for the steam to expand the hairs back to their original round shape and shrink the thread wraps, tightening them down around the hair. You see, when you handle and pack the hair, you smash it flat in cross-section. Steaming the hair allows it to expand and become tighter on the hook and stiffens the hair as well. I find the stiffening makes a big difference when trimming the fly. The harder hair stands up to the razor blade a lot better and allows you to make cleaner cuts. I sometimes will steam a fly three or four times during the trimming process to assure that I get any flattened hairs out. The results are obvious when viewed up close. The hair ends go from being flat and dull to circular and shiny, giving the bug a nice sheen. The steaming process also keeps the fly from changing shape when it is fished, as water will have the same effect on the bug as the steam would. You don’t want to spend an hour trimming a bug without steaming it first and have it “grow” once it gets wet. (Youll see what I mean by ‘grow’ when you steam your first fly.)
The process of creating a hair bug is rather long and arduous, but is well worth it when you produce a bug to be proud of. The real key to tying this, and all other flies, is to practice. You probably won’t get it exactly right on the first try. Stay with it, learn from your mistakes and before long, people will be asking you to show them how to build these beauties. Some people say that a loosely tied hair bug (or foam head popper) fishes as well as a well-tied version. I say this is an excuse to fish with crappy flies that have no character. Not only are well-tied bugs beautiful to behold, they are incredibly durable and instill a confidence in the angler. I remember a few years ago, some friends and I had access to an overstocked private bass pond. I left a fast-action six-weight rod in the boathouse for use by the members. At the beginning of the season I tied one of my tightly packed deer hair poppers on the end of a stout leader and left it strung up on the rod. That fly caught more bass that year than I can imagine. Over the course of the summer I am sure I caught in excess of two hundred fish on it, and who knows how many my friends caught! It gives me a warm feeling inside to know so many fish were caught on a bug from my vise. The fly was a little dog-eared by October, but still in perfect fish-catching shape. I retired it to my Fly Hall of Fame until the next season when I snagged it in the top of a bankside cottonwood tree and lost it. I bet its still up there and in great shape…and No, I’m not saying where.
Materials Needed:
Hook: TMC 811S #1/0
Thread: White Size A Monocord for weed guard and tail assembly, Natural Yellow Kevlar for Deer Hair Head, Fire Orange 70 Denier for thread head and weed guard tie off.
Weed Guard: Mason Hard Mono, 20-Pound Test
Tail: Matched Sets of Neck Hackle, White, Chartreuse Grizzly and Yellow Grizzly from inside to out, tied with curves opposed.
Marabou Collar: Marabou. Chartreuse over yellow over cream over cream (on the underside of the shank).
Hair Head: Dyed Deer Hair. Green over yellow over cream.
One item to note before continuing is that the colors of the hair and tail materials are completely up to you when tying this pattern. The colors I have chosen are sort of pan-fish/frog variations and work well but this type of fly produces in a variety of color combinations. Let your imagination be your guide.
Step 1
Attach white Size A Mono at the bend of the hook and form a thread base halfway down the curve of the bend.

Step 2
Move thread back to its starting point and tie in a five-inch length of 20-pound Mason Hard Mono. Be sure to anchor it directly atop the hook at the bend.

Step 3
Bind the mono to the top of the shank halfway down the bend of the hook. Return the thread to the starting point. Try to make the thread wraps over the mono as smooth as possible. Cover the thread wraps with a light coat of Sally Hansens Hard As Nails. Take a break and let the polish dry for a few minutes. I will usually tie up several weed guard assemblies and coat them in advance.

Step 4
Prepare the hackle feathers for the tail section as you would for a Keys Style Tarpon Fly. If you’re not sure how, check the tarpon fly on the website (www.charliesflybox.com) for complete directions. Tie the feathers in at the bend, just in front of the weed guard tie off point. Make sure the tail feathers don’t twist out of place when tied in.

Step 5
The tail feathers should extend past the bend of the hook about two shank lengths and curve away from each other as pictured.

Step 6
Tie in the marabou collar, again as you would with a tarpon fly. Here, I put one cream feather on the underside of the shank, another cream feather on the top of the shank, a yellow feather on top of that and finally a chartreuse feather on top of that. Build a smooth and slightly bulbous thread head and whip finish the Size A Mono. Add a drop of head cement.

Step 7
Attach the yellow Kevlar thread to the shank just behind the eye and wrap a thread base back to the bend, forward to the eye and back again to the bend.

Step 8
Invert the hook in the vise, or, even better, use the rotary feature of your vise to turn it over. (You did buy the vise with the rotary feature, right?)

Step 9
Cut, clean and stack a VERY large clump of cream-colored deer hair. Make sure to remove ALL of the under fur from the hair. I use a comb to clean the shorter hairs as well as any under fur from the clump. Place the hair at the bend of the inverted hook with the tips (skirt) extending to just past the end of the hook and make one turn of thread over the clump.

Step 10
Make two more turns of thread over the hair directly on top of the first wrap.

Step 11
Hold the hair in place on the underside of the hook and pull down hard on the thread to flare the clump. You do not want the hair to spin, only flare in place. You should feel the thread slide down tight around the hair as you pull. Make sure the hair is completely compressed at the point where the thread crosses it. Leave the thread hanging in the center of the hair bunch. Do NOT move it to the front.

Step 12
Detail of flared bunch of hair.

Step 13
Turn the hook over but make sure that the thread stays centered in the clump as you turn it.

Step 14
Cut, clean and stack a large clump of yellow deer hair and place it atop the hook with the tips even with those of the first cream bunch. This bunch of yellow hair should be relatively long as it is what will form the collar.

Step 15
Place another three wraps of thread over the center of the yellow hair keeping the thread in the middle of both bunches.

Step 16
Place your index finger against the yellow hair on the far side of the hook to hold it on top as you pull down on the thread to flare it.

Step 17
Yellow hair is completely flared on top of the cream hair. The thread is still hanging in the center of the hair clump.

Step 18
Cut, clean and stack a slightly smaller clump of green deer hair. Place this clump on top of the first two bunches with the tips equal in length to the first two bunches.
Step 19
Place three turns of thread over the center of the green bunch and flare it on top of the first two bunches. Pull down hard on the thread to sink it completely into the hair. Pull all the butt ends to the rear of the hook and work the thread to the bare shank at the immediate front edge of the hair bunches. Be careful not to bind down any hairs as you work the thread forward.

Step 20
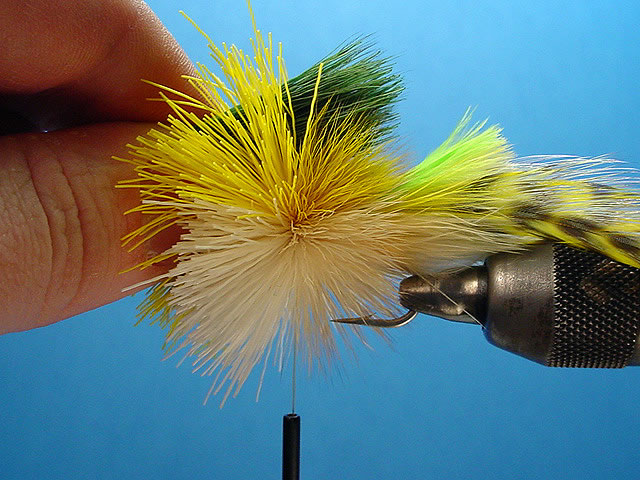
Cut a four by four-inch piece of plastic from a fly tying material baggie (heavy mil plastic). Make a cut from the edge to the center of the square. This piece will be used to hold the collar hair out of the way while we tie and trim the rest of the head.

Step 21
Slip the thread through the slit in the plastic sheet and slide the plastic up to the front of the hair bunches. The end of the cut you made (the center of the piece of plastic) should be against the hook shank.

Step 22
Fold the plastic around the hair like a cone, forcing all the hair back along the shank. The tying thread should be in front of the plastic sheet and the hair should be behind it. Wrap a piece of .035 lead wire around the hair and plastic to hold it in place.

Step 23
Continue flaring and stacking another three colors of hair as you did with the collar. Use the same steps and color sequence.

Step 24
Pack the stacked hair back toward the bend with your fingers. Push hard and twist side to side slightly to buy yourself a little more space at the front of the shank.

Step 25
Detail of additional space gained by packing the hair.

Step 26
Flare and stack ANOTHER three colors of hair at the front of the second batch in the space you created in the previous step.

Step 27
After all three bunches are secured, move the thread to the index point and whip finish the Kevlar. You may want to cut another sheet of plastic like you did for the collar to hold the hair back while you whip finish. Clip the thread. Make sure the color bands are aligned and as even as possible. If one band is off to the side, grasp the bunch and twist it so it’s straight and in line with the other and square to the hook shank.

Step 28
Use a double edge razor blade to trim the bottom of the head. I break the blade in half lengthwise so I only have one sharp side to deal with at a time. Bend the blade a little as you make the cut from the eye to the plastic/collar, creating a rounded shape.

Step 29
Make another cut along the top of the head, again with the blade slightly bent to round the top and sides. These are only preliminary shaping cuts. We are just trying to get a general size and shape before going on to the final trimming so leave the hair a little long for the time being.
Step 30
This photo shows the fly after steaming. Remove the wire and plastic sheet. Hold the fly by the bend in a pair of hemostats and place it over the spout of a kettle of boiling water. Let the steam expand the hair and work completely through the hair. Be mindful of keeping the tail feathers out of the way while steaming the fly as the steam can curl the tails and change their orientation.

Step 31
I have now gone back with the razor blade and cut the front end of the head closer to its final shape. I like to make very shallow cuts all the way around the fly, easing it into the final shape. Make sure to trim the hair along the bottom of the fly close enough so that it doesn’t impede on the gap of the hook. I have also cut the deer hair collar to length and cleaned up the front end of the head around the hook eye. The collar should be slightly shorter than the tips of the skirt and radiate from the top half of the fly only. I have trimmed all the butt ends off the cream hair on the underside of the shank, leaving only the natural tips for the skirt.

Step 32
Take another four by four-inch piece of plastic and poke a hole through its center with the tips of your scissors.

Step 33
Push the eye of the hook through the hole in the plastic sheet.

Step 34
Use the plastic sheet to hold the hair behind the hook eye back and out of the way while you attach the hot orange 70 Denier thread. The plastic will help to clear the index point of hair and make for a clean tie off area for the weed guard.
Step 35
Loosen the grip of the jaws on the vise and then replace the hook in the vise with the weed guard threaded through the jaws along the bend of the hook. Be careful not to pinch the mono in the jaws of the vise. Do not attempt to tie off the weed guard by leaving the mono along the side of the jaws, as you need to keep the mono exactly centered with the hook bend to be effective. Pull the mono weed guard forward and push the end up through the hook eye. Pull the end of the mono through the eye until the loop formed by it at the bend is within a quarter inch of the hook point.

Step 36
Pinch the front end of the measured mono weed guard with a pair of hemostats or pliers to flatten it down. This pinch will mark the length of the weed guard. Remove the mono from the eye and flatten a bit more of it on either side of the original mark.

Step 37
Push the flattened end of the mono back up through the hook eye and pull it to the pre-measured length. Tie the mono down under and behind the hook eye with the thread.

Step 38
Pull the loose end of the mono toward the bend of the hook and wrap the thread over it, forcing it down along the top of the shank immediately behind the hook eye. It is best to do this with a very short length of thread between the bobbin and the hook. Flattening the mono guard before tying it down keeps it from taking up too much space in the eye, leaving enough room for your tippet, and assures that the guard stays centered once tied down.

Step 39
Cut the loose end of the mono with the razor blade as closely as possible. Wrap the thread to cover the stub end and form a smooth, clean head. Whip finish the thread and clip it.

Step 40
Pull up and then down on the plastic sheet to pop it over the hook eye. You may need to pull the edges of the hole from under the thread wraps you made earlier. The mono weed guard is now threaded through the hole in the center of the plastic.

Step 41
Cut the plastic from the edge to the hole in the center, releasing the mono weed guard. Remove the plastic sheet and discard. Apply a layer of thin had cement to the thread head. I usually coat the bottom of the head with thin cement as well. This glues all the hair to the shank, keeps the head from rotating and adds durability.

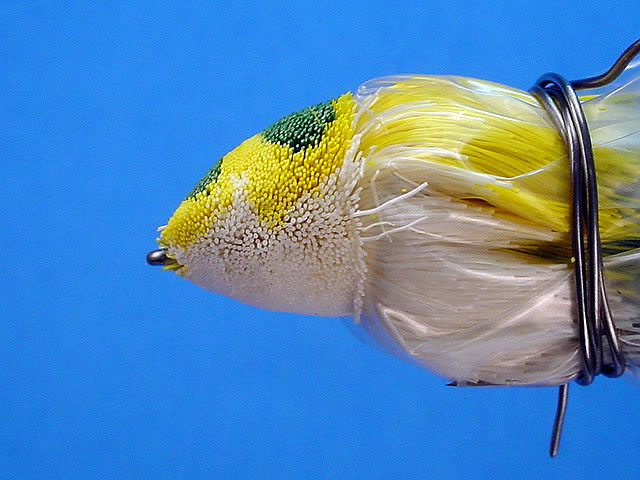
Step 42
Close up of head shape. Notice the abrupt, square shoulder behind the thread head formed by using the plastic sheet during the weed guard tie off.

Step 43
Finished fly, side view. Notice the length of the tails, the size and shape of the head and diving collar and the length of the hair tips in the skirt.

Step 44
Finished fly, top view. Notice the evenly spaced bands of green hair and the splay of the tails.

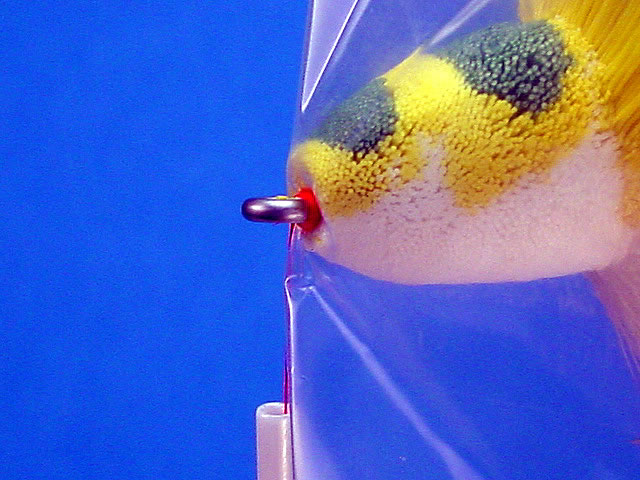
Step 45
Finished fly, front view. Notice the symmetry of the head, the radius of the collar and the way the weed guard lines up with the hook point.
