The Rogue Stone is a product of fellow Umpqua Fly Designer, Jack Schlotter. This pattern has become the hot fly for our western salmonfly hatches on rivers like the Gunnison and Colorado. I have added this pattern because it is one that so many people ask about and because it is a little tough to figure out empirically. The unique extended foam body provides excellent floatation and good durability. The original pattern features a sheet foam underwing that I have replaced with Web-Wing. The underwing has just never made sense to me. I mean, the elk hair imitates the fluttering wings while the foam wing imitates the…? The Web-Wing was added to keep the pattern a little closer to standard, but to be honest; I would leave it off altogether on my own patterns.
So, here’s the tutorial for tying the famous Rogue Stone. It is actually really fun to tie after you get the hang of it and is such a great pattern that you certainly want to have a few in the box.
Materials Needed:
Hook: TMC 200r #4-8
Thread: Black or Orange 3/0 Monocord
Abdomen: White Closed Cell Foam, colored with marker
Underwing: Mottled gray Web-Wing
Flash: Root beer Krystal Flash
Overwing: Natural Cow Elk Hair or Elk Mane
Bullet Head: Natural Gray Deer Hair
Legs: Black Round Rubber, medium or small
Special Additions: Hat Pin and Bic Pen tube
Step 1
First, cut a strip of foam that is about five or six inches long and as wide as the gap of the hook. The foam is not tapered, although it appears that way in the photos.

Step 2
Poke the tip of a hatpin through the foam at the center of its length.

Step 3
Put the tip of the hatpin in the jaws of the vise as shown.

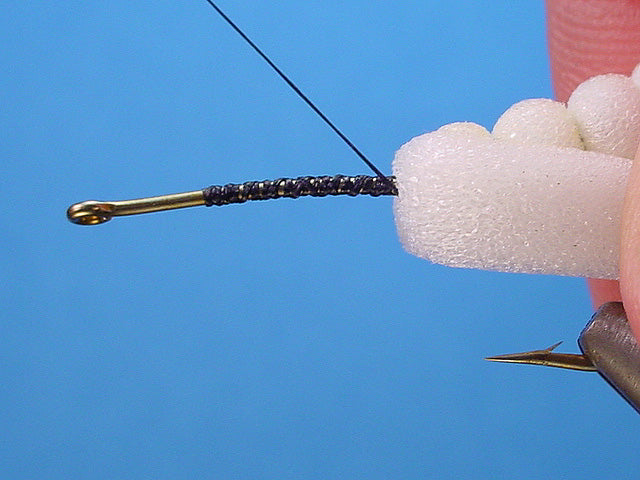
Step 4
Start your thread on the hatpin in front of the foam strip. Do not make a bunch of wraps to secure the thread, just enough to anchor it.

Step 5
Slide the foam up to the thread base as shown here.

Step 6
Fold both side of the foam forward along the shank of the pin. Hold them in place as shown.

Step 7
Make three tight turns of thread over the foam to create the first segment.

Step 8
Pull the two sides back again…

Step 9
…and work the thread forward an equal distance for the next segment.

Step 10
Make another three turns of thread to form the second segment.

Step 11
Repeat the above process one more time for a total of three segments.

Step 12
Whip finish the thread, either by hand or with an extended reach whip finisher on top of the third segment. Clip the thread.

Step 13
Grasp the foam segments tightly and withdraw the pin.

Step 14
You should now be holding something that looks a lot like this.

Step 15
Finally, start the thread on the hook and form a thread base from the seventy-five percent point back to just in front of the hook point. Try to stay up on the straight portion of the shank. If you go too far back on the bend, the extended body portion will point down, so don’t do that!

Step 16
Place the body blank on the shank as shown with the foam strips along the sides of the hook shank. The thread should be lined up with where the next segment will be.

Step 17
Make three more tight turns to create the next segment like you did when we were tying on the pin. Make sure the segments are relatively equal in length to those that have already been formed.

Step 18
Fold the two foam strips back again and work the thread forward slightly for the next segment.
Step 19
Continue the segmenting process up the hook shank forming a total of four segments on the hook shank. You should have about a fourth of a shank length left in front of the foam segments.

Step 20
Clip the excess foam flush against the front of the body as shown.

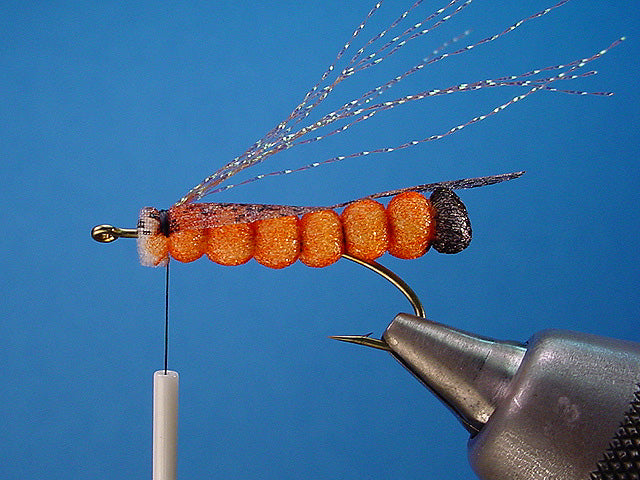
Step 21
Color the foam body with a permanent marker. I have colored the first segment black to imitate the egg sac of the natural. This egg sac is totally optional but makes for a nice effect.

Step 22
Cut a strip of Web-Wing that is about as wide as the gap of the hook. Round the end with your scissors to form a wing shape as shown.

Step 23
Place the Web-Wing on top of the foam abdomen so the end of the wing extends past the end of the foam just slightly. Tie in the wing on top of the last foam segment. Trim any excess Web-Wing off flush at the front.

Step 24
Top view of wing.

Step 25
Tie in five strands of root beer colored krystal flash at the center of their length on top of the base of the Web-Wing.

Step 26
Fold the forward pointing strands of krystal flash back over the top of the body and secure them in place with a few turns of thread.
Step 27
Cut, clean and stack a medium sized (pencil diameter) clump of elk hair or mane. Measure the hair against the hook so it extends to just beyond the foam body.

Step 28
Tie the elk hair onto the front edge of the body at the joint where the Underwing is tied in. The hair should flare quite a bit when you have it properly secured.

Step 29
Trim the butt ends of the hair off flush against the top of the body. Note the distance between the front edge of the body and the hook eye.

Step 30
Wrap a thread base from the front edge of the body to the hook eye. Be sure these wraps are tight! Leave the thread hanging at the hook eye.

Step 31
Cut, clean and stack a large clump of deer hair for the bullet head. Measure the hair against the shank so the tips of the deer hair extend to the midpoint on the shank. Put the hair back in the stacker and re-stack it. This time, when you remove the hair, hold the tips in your thread hand with the butts exposed. Cut the butt ends of the hair

Step 32
Place the butt ends just behind the hook eye as shown. Oh, yeah, be careful when coloring the body so you don’t get ink all over your thumb!

Step 33
Place three semi-tight turns of thread over the butt ends of the deer hair. Keep these wraps close to the ends of the hair.

Step 34
Pull down and slightly back on the thread to spin the deer hair around the hook. I hold onto the hair lightly while I apply tension to the thread and allow it to slip from my fingertips to spin.

Step 35
Stroke the hair forward slightly to clear the hook shank. Move the thread back to the last segment of the body/base of the wing.

Step 36
Detail of thread placement.

Step 37
Front view of the spun hair. Spread the hair in a complete 360-degree arc around the hook eye with your fingers. Try to keep the hairs radiating out from the center in straight lines, with little overlap or crossing.

Step 38
Push the end of a Bic pen or similar diameter plastic tube back over the deer hair to form the bullet head. It works best when the hair is somewhat compressed in the tube to help keep it tight. Push the tube back until the end of the tube is even with the thread.

Step 39
Make two loose turns of thread over the hair at the back of the tube then start to tighten the thread. Add another tight wrap over the hair to anchor it.

Step 40
Remove the tube from the head. The head should look something like this. Notice the hairs are straight back along the sides and top of the head.

Step 41
Wrap a piece of .020 lead around the tips of the deer hair collar and wing to hold them out of the way while we do the legs.

Step 42
Tie a three-inch length of round rubber in at the joint between the head and the collar on the near side of the hook.

Step 43
Tie another piece of rubber along the far side of the hook in the same joint.

Step 44
Trim the rubber legs so they are even with the end of the foam body in back and about half that length in the front. Whip finish the thread on top of the thread segment between the head and collar. Clip the thread.

Step 45
Finished fly, side view.

Step 46
Finished fly, bottom view.

Step 47
Top view.

Step 48
Quartering view.

Step 49
Front view. Did you notice that the hook eye on this particular hook is not parallel with the hook point? The fly is square with the hook bend but the eye is twisted a little…aw, Man, this fly will never work 😉
